OM3 + Nikon Zf: Match Made in Monochrome?

Dedicated dials for black and white must mean the recipes are good, right?
Unlike the endless options in color editing, black and white comes down to 6 settings, the OM3 and Zf can change these in camera (all but 2?). After changing 1 setting at a time across 5 photowalks - day and night - I setup JPEG recipes plus two monochrome RAW file presets. How do they compare against Fujifilm’s Acros, or the dedicated monochrome output from Leica’s M11M?
Are these dials just a gimmick?

Tweaking one setting at a time is how I made a black and white “look” for both the Zf and OM3.
Actually 2 looks, neither may be to your taste, but hopefully my workflow can help you find yours:
1 & 2: Sharpness & Contrast.
I like to turn down both, most cameras interpret these settings too aggressively. Finer details already pop more in monochrome than they do in color. On my first day-time monochrome photowalk I’m testing my Zf (TTArtisan 40mm f2) versus the Fuji XT3 (23mm f1.4 R).
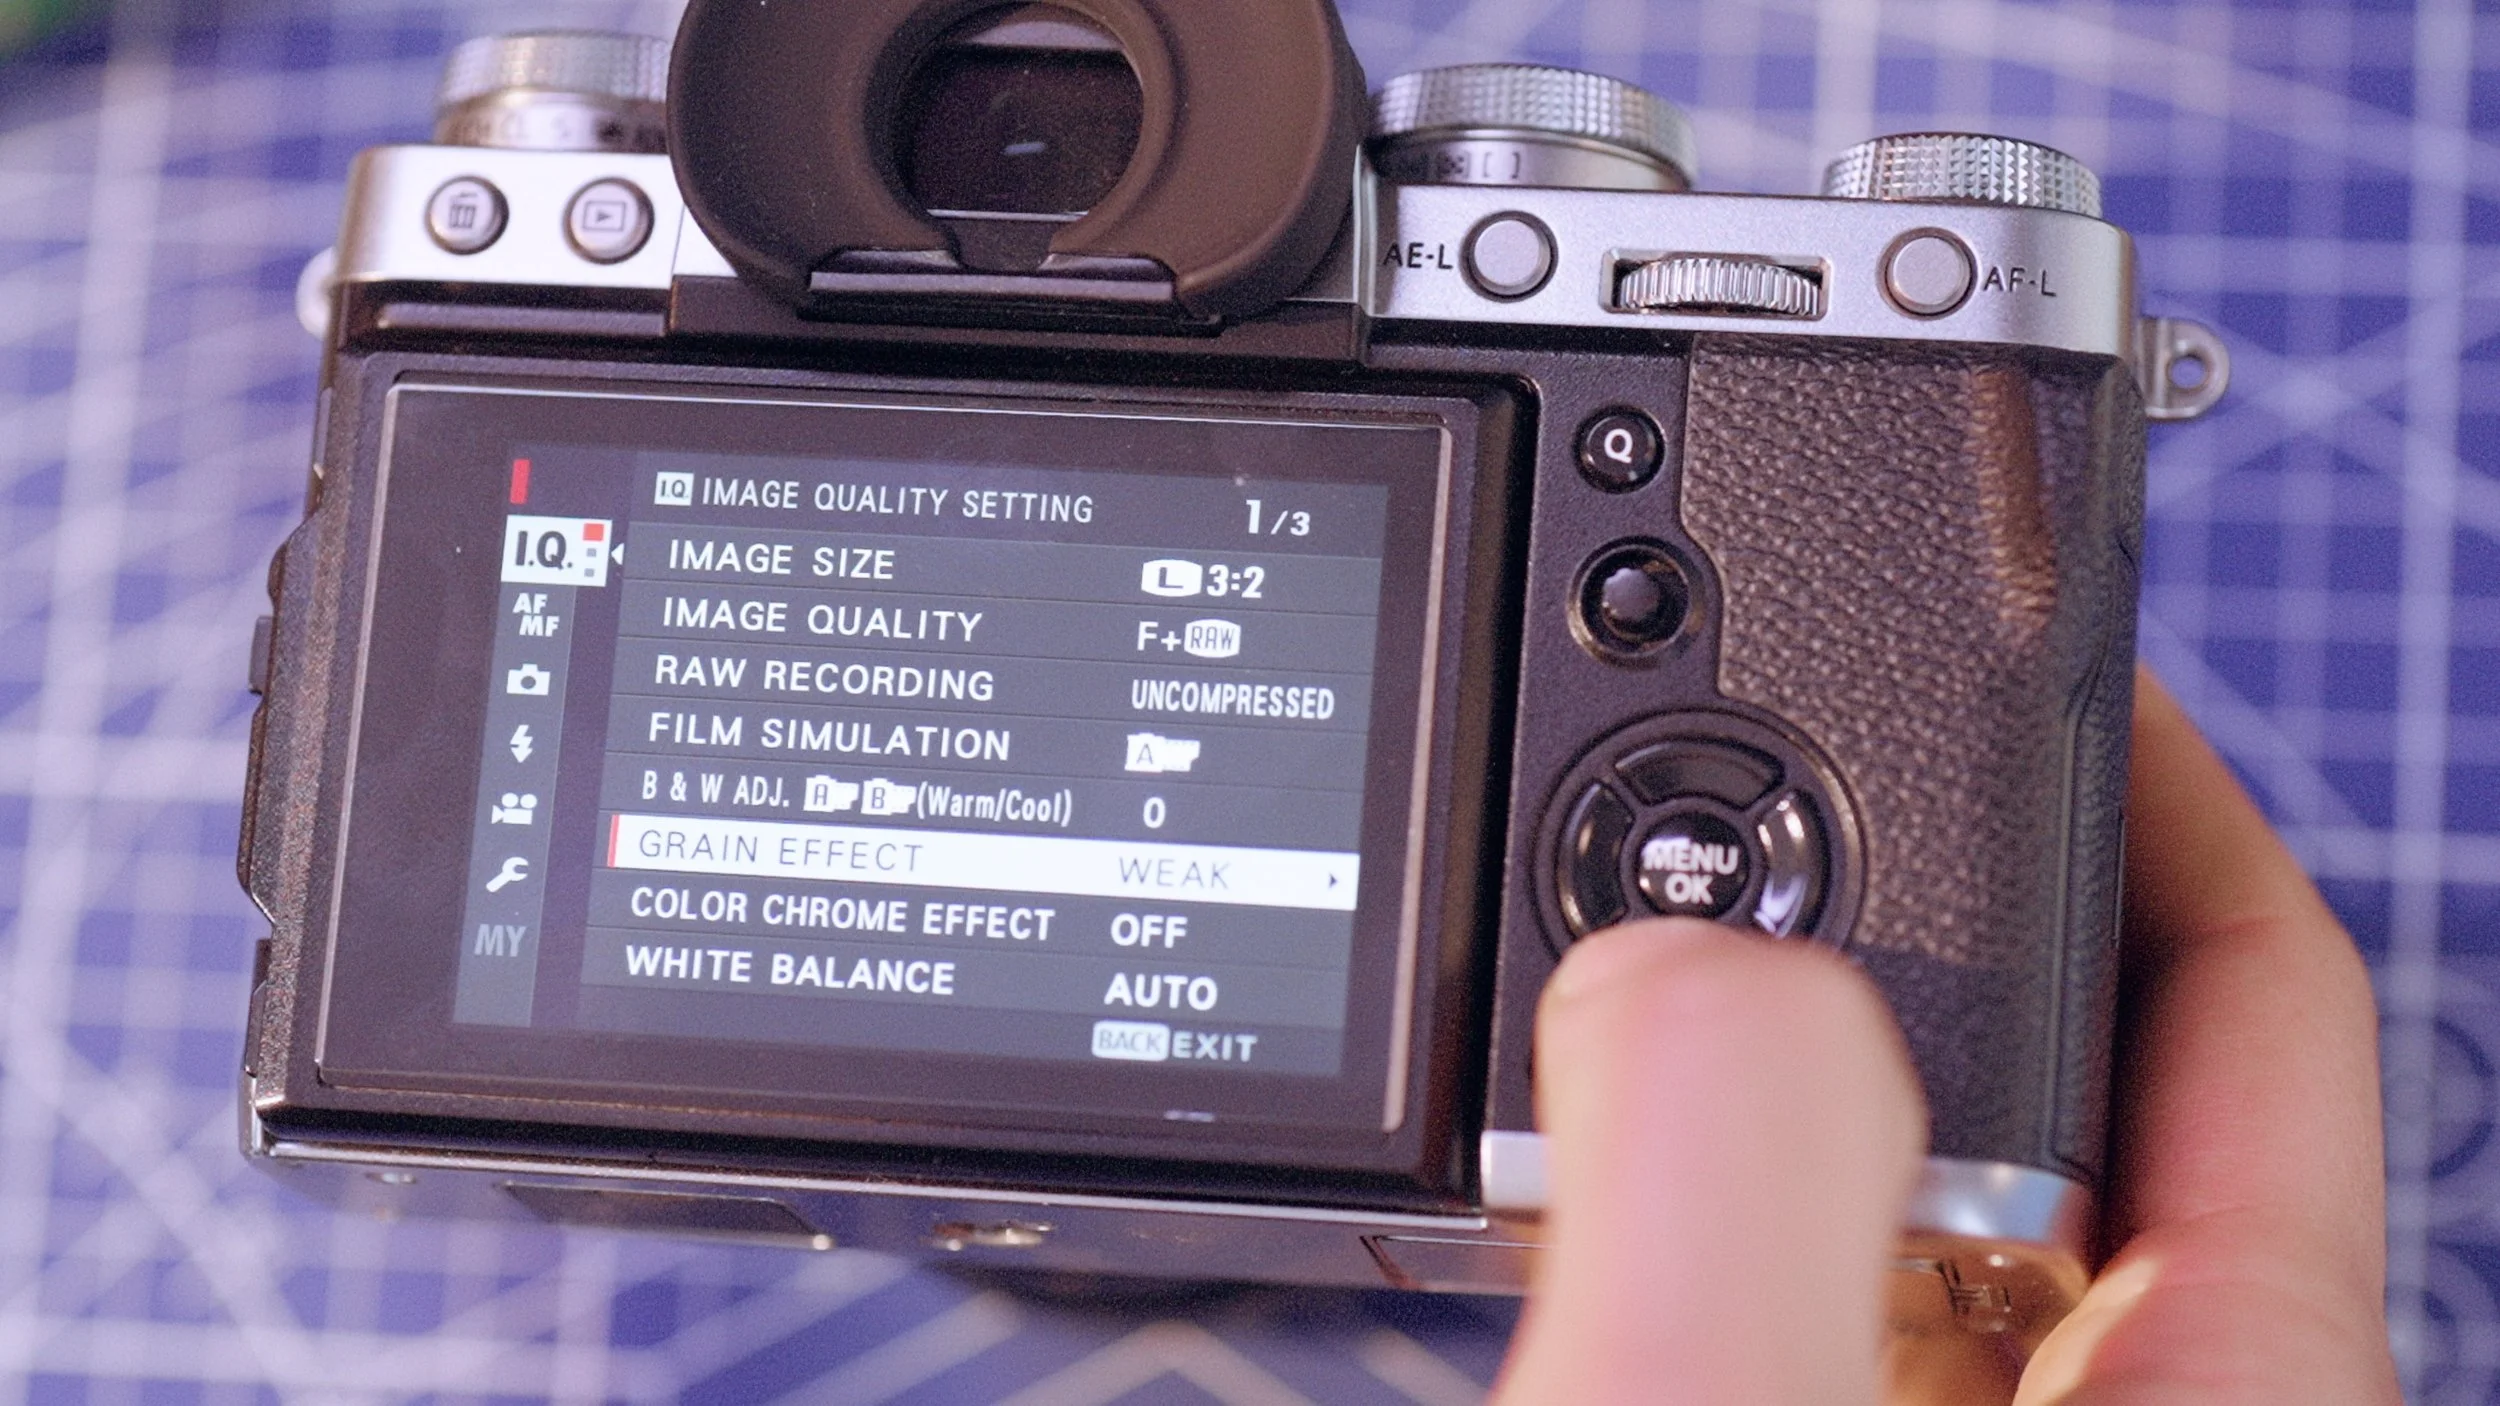
My tried and true Fujifilm Acros recipe is as follows:
Film simulation: Acros + R
Grain Effect: weak
Color Chrome Effect: OFF
WB: Auto
Dynamic Range: Auto
D Range Priority: OFF
Highlight Tone: + 2 (or +1 if you want a gentler look)
Shadow Tone: + 2 (or +1)
Sharpness: -1
Noise Reduction: -2
It’s pretty basic, I’m leaning into how Acros looks by default (a pretty stylized monochrome recipe as it stands), the Zf’s monochrome modes look more neutral. On the Nikon Zf there are three monochrome profiles (Monochrome, Flat Monochrome, Deep Tone Monochrome) I went for Deep Tone Monochrome (the most stylized profile) to see how close it looks to Acros.
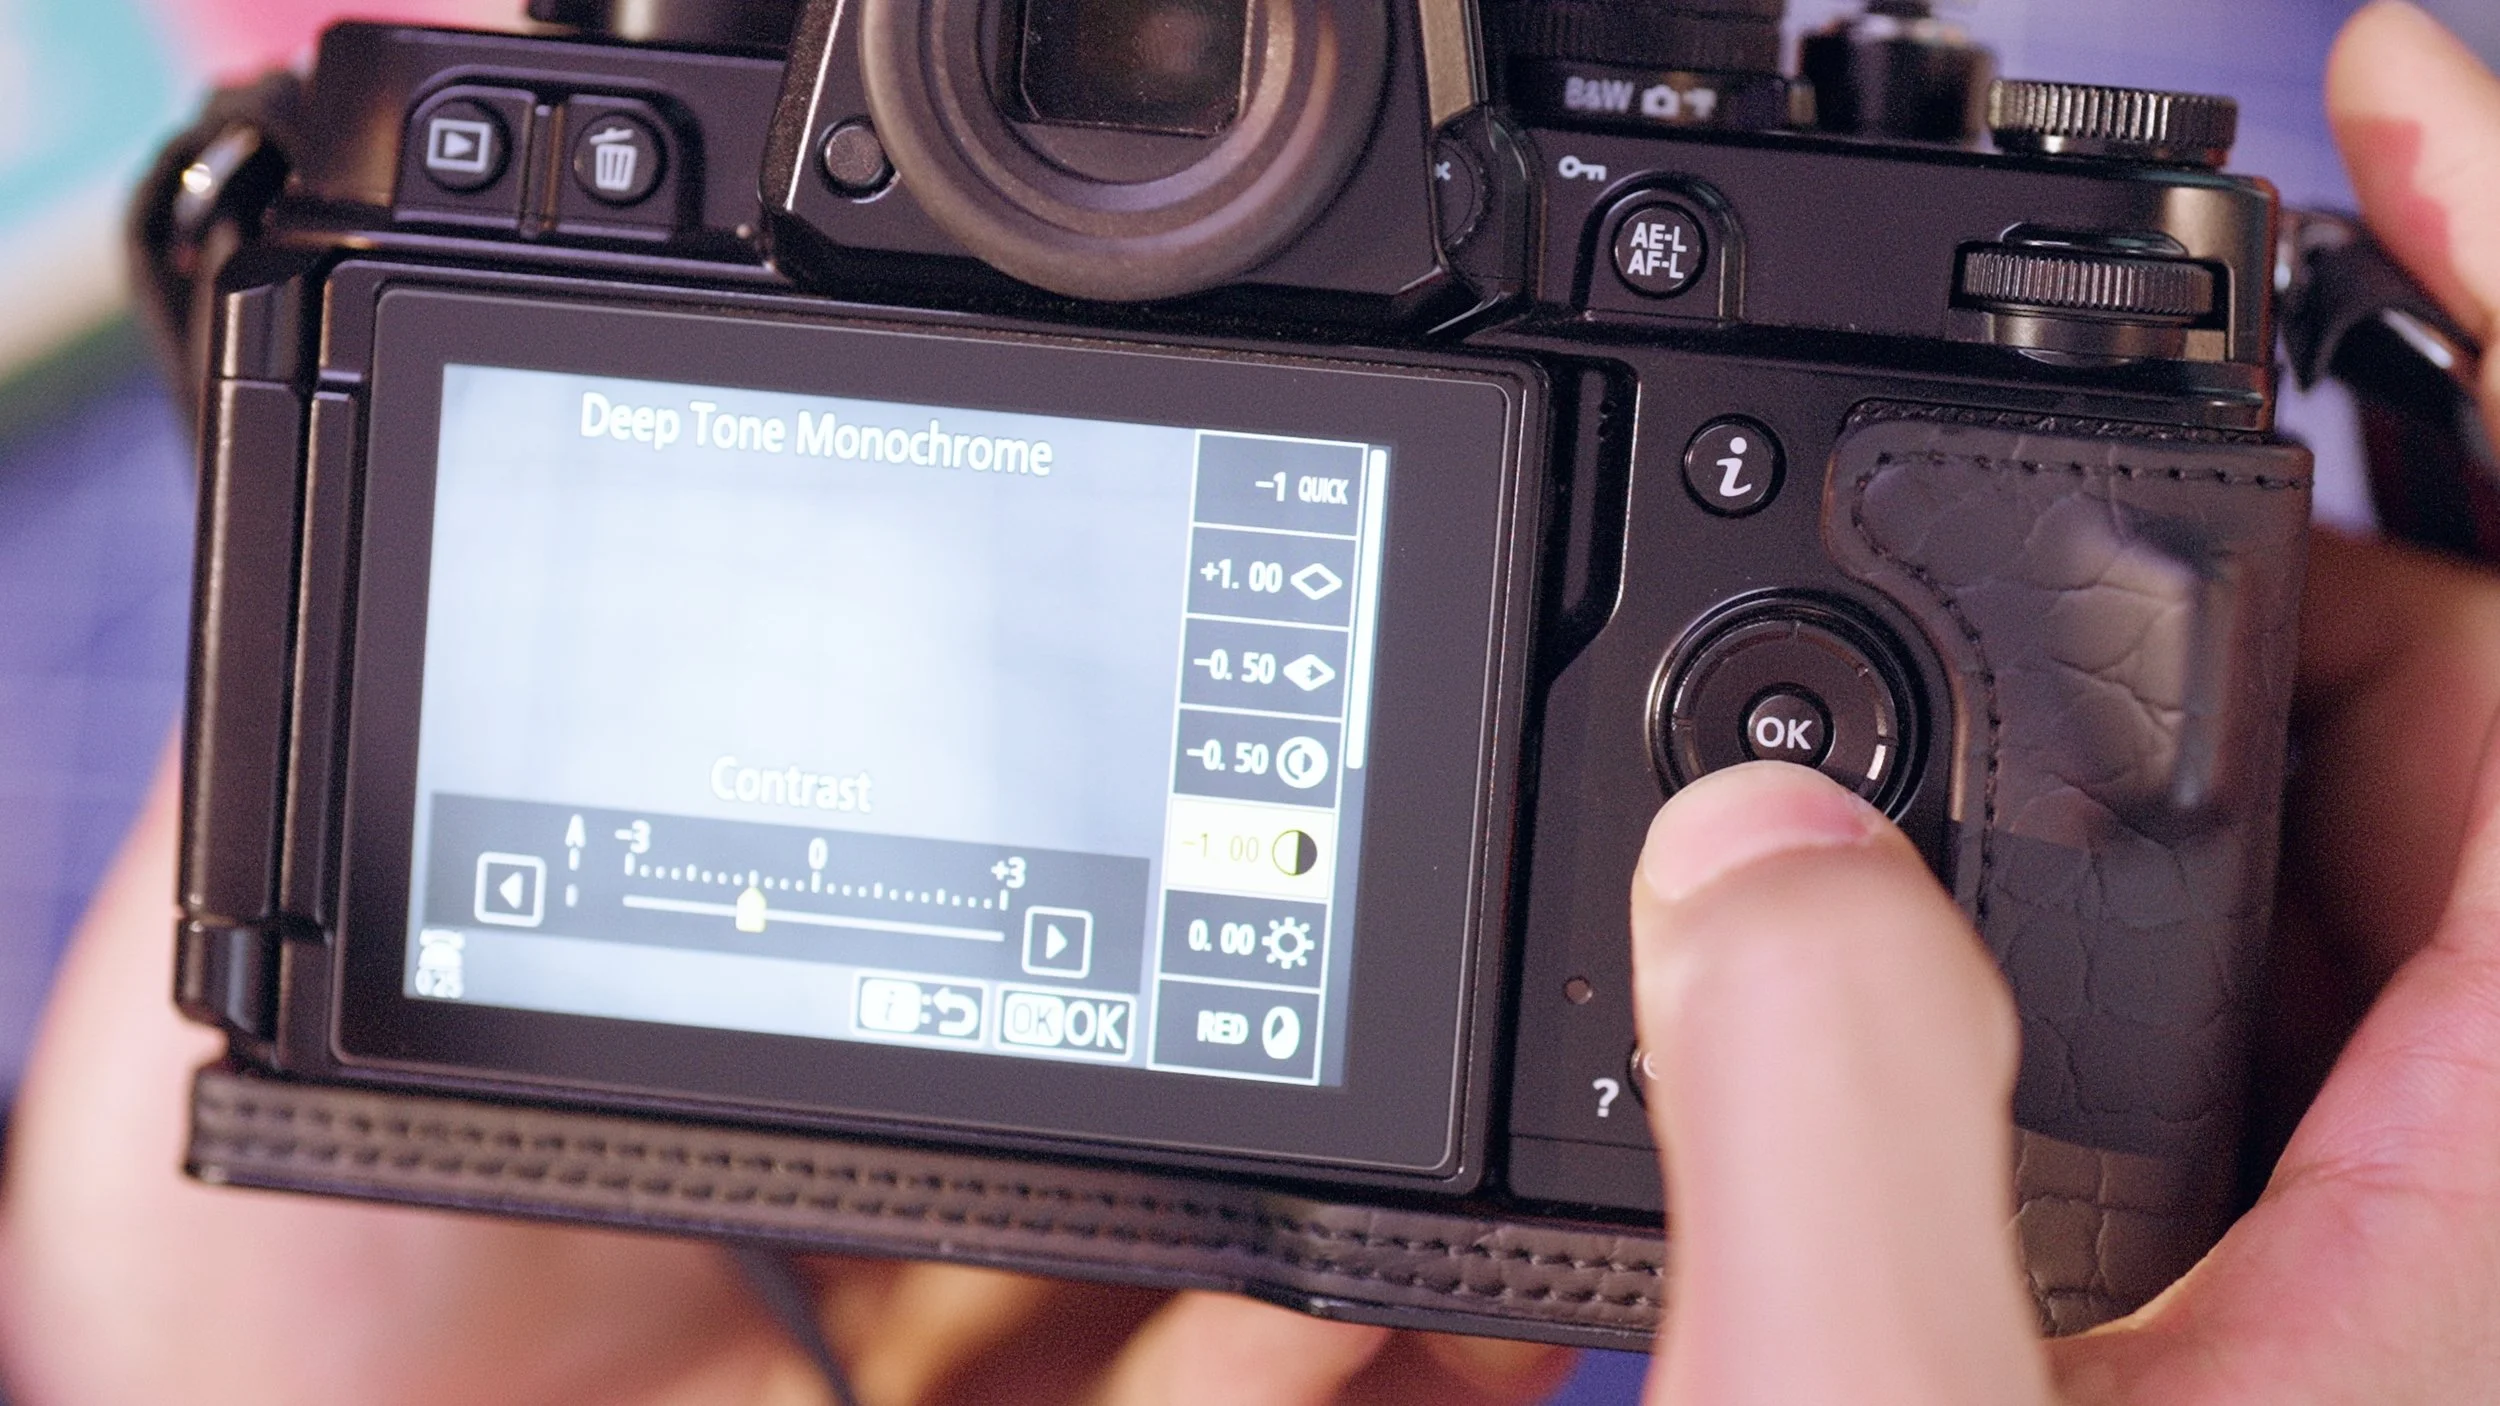
There’s more finetuning available on the Zf compared to Fuji when it comes to sharpening, mid-tone sharpening, clarity, I use the quick sharp setting to -1, sharpening to -1, contrast to -1 too. If it’s more contrast you’re after, you can always add it back through composition. I’m shooting at noon, the light is at its harshest overhead, light and shadows are easy to find in geometry.
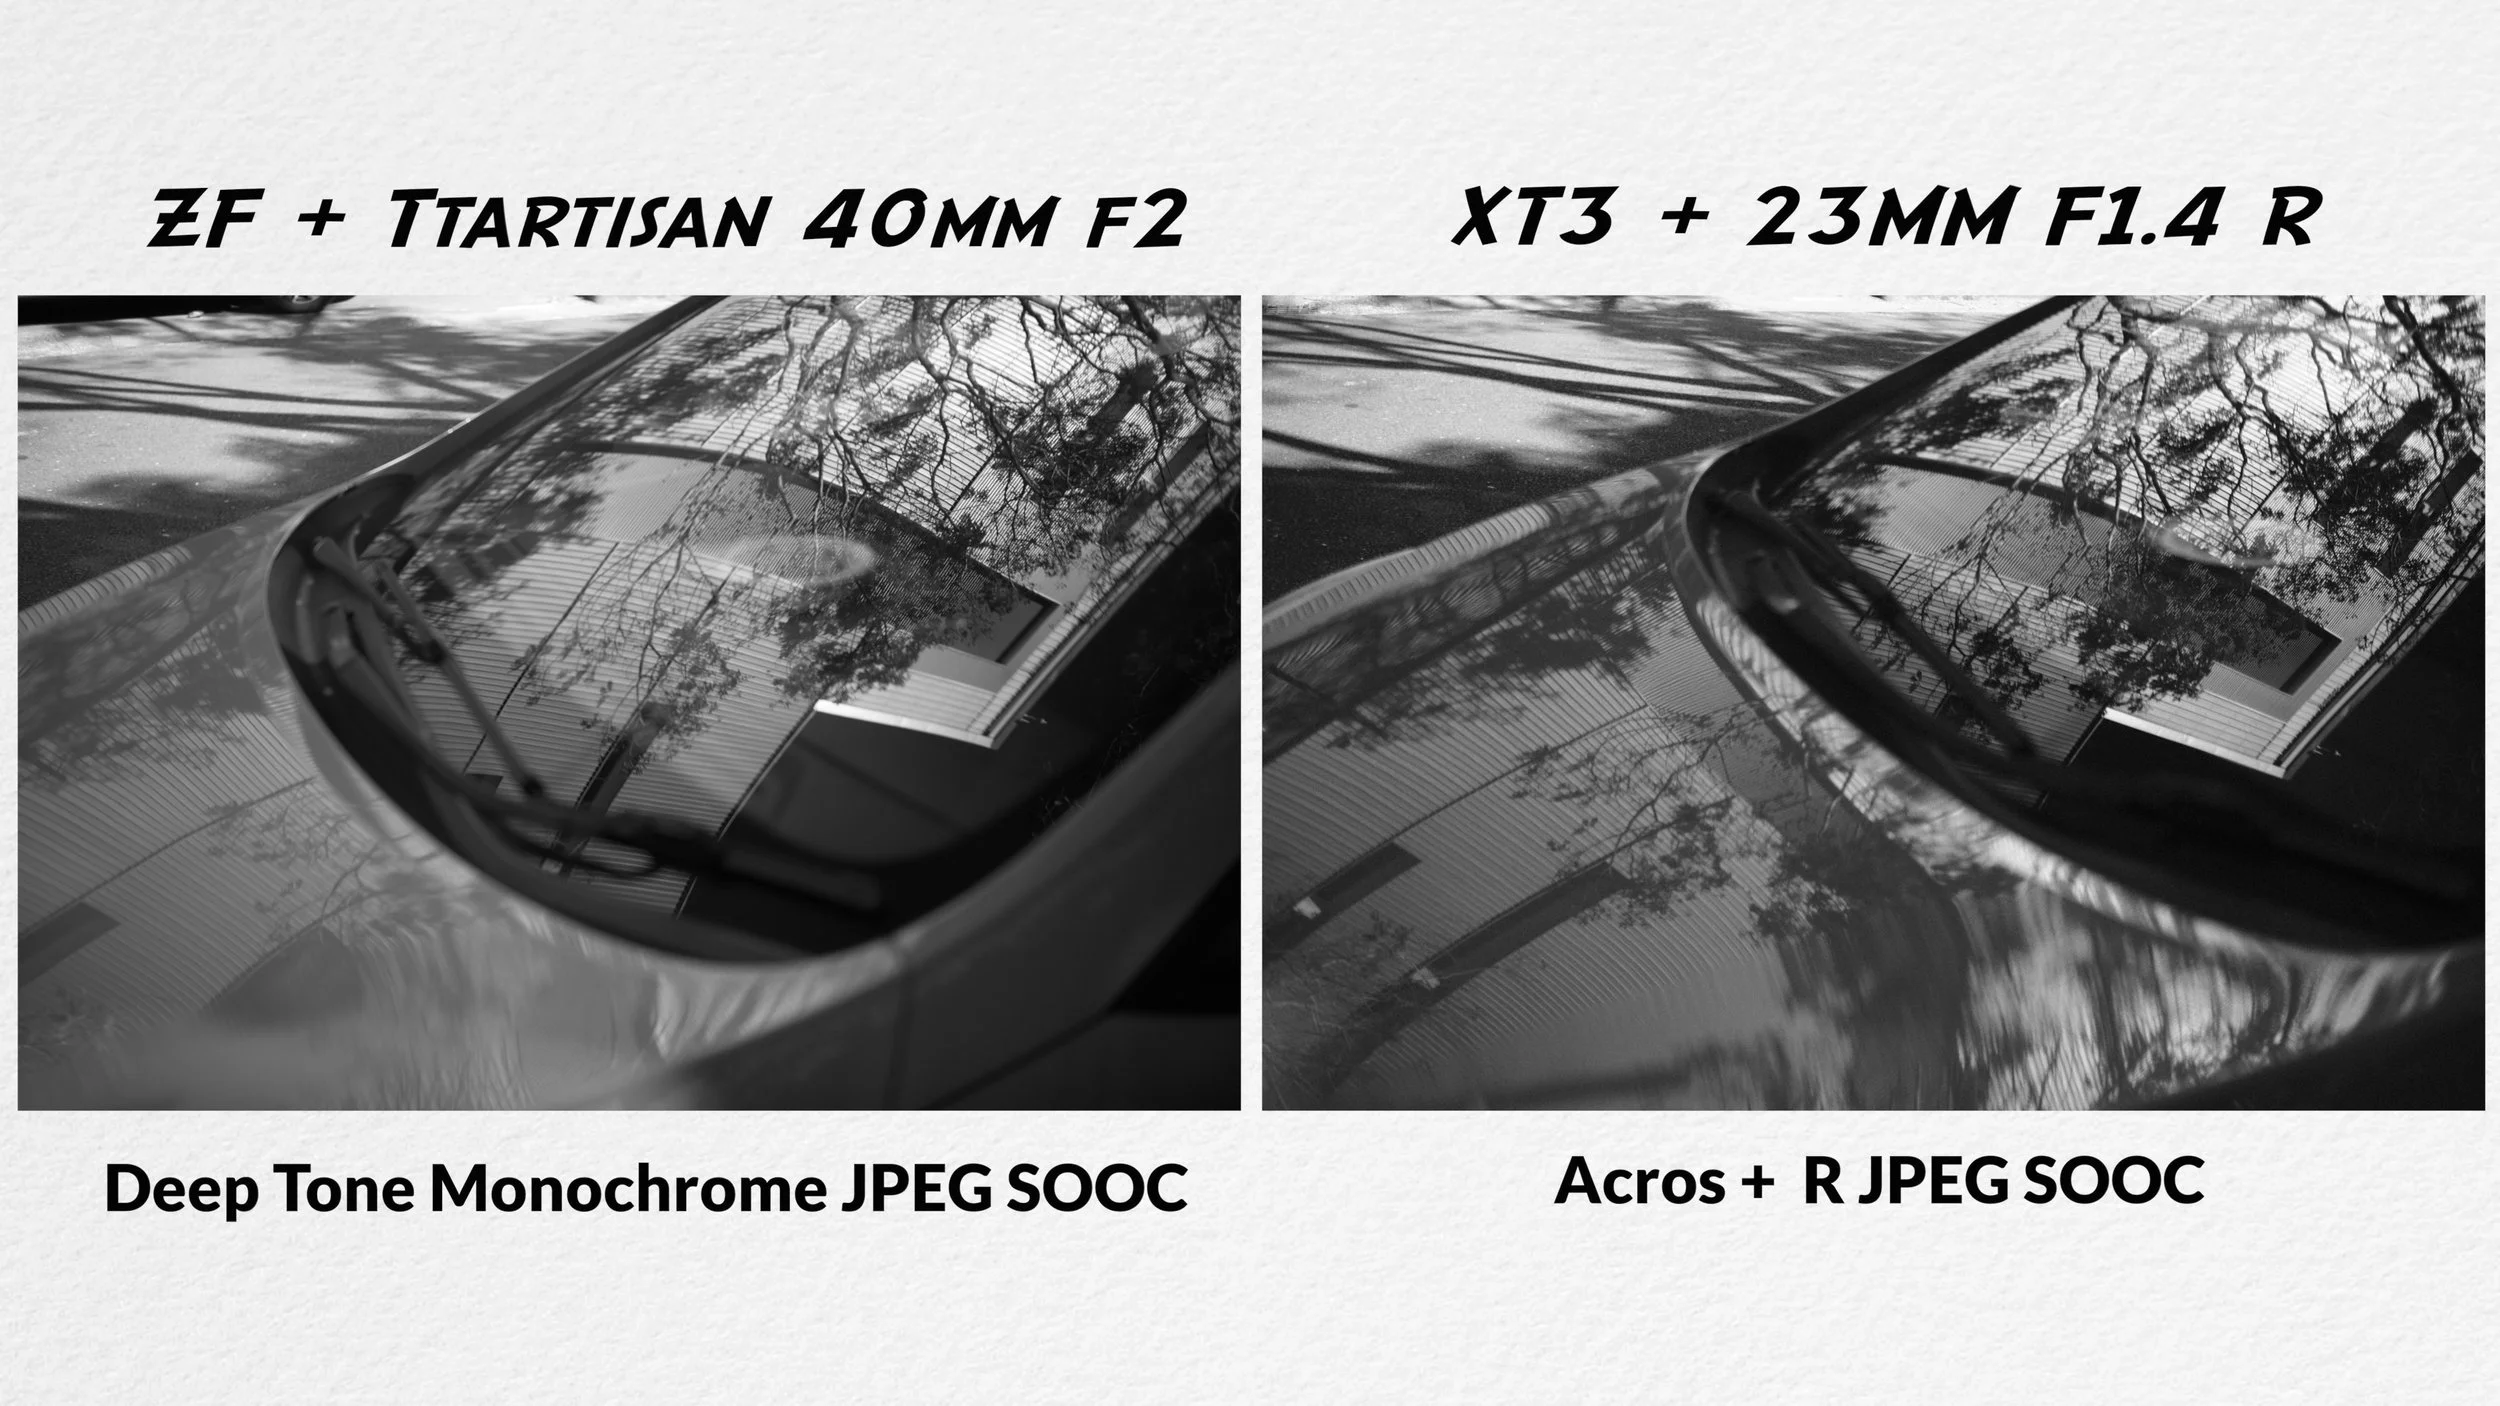
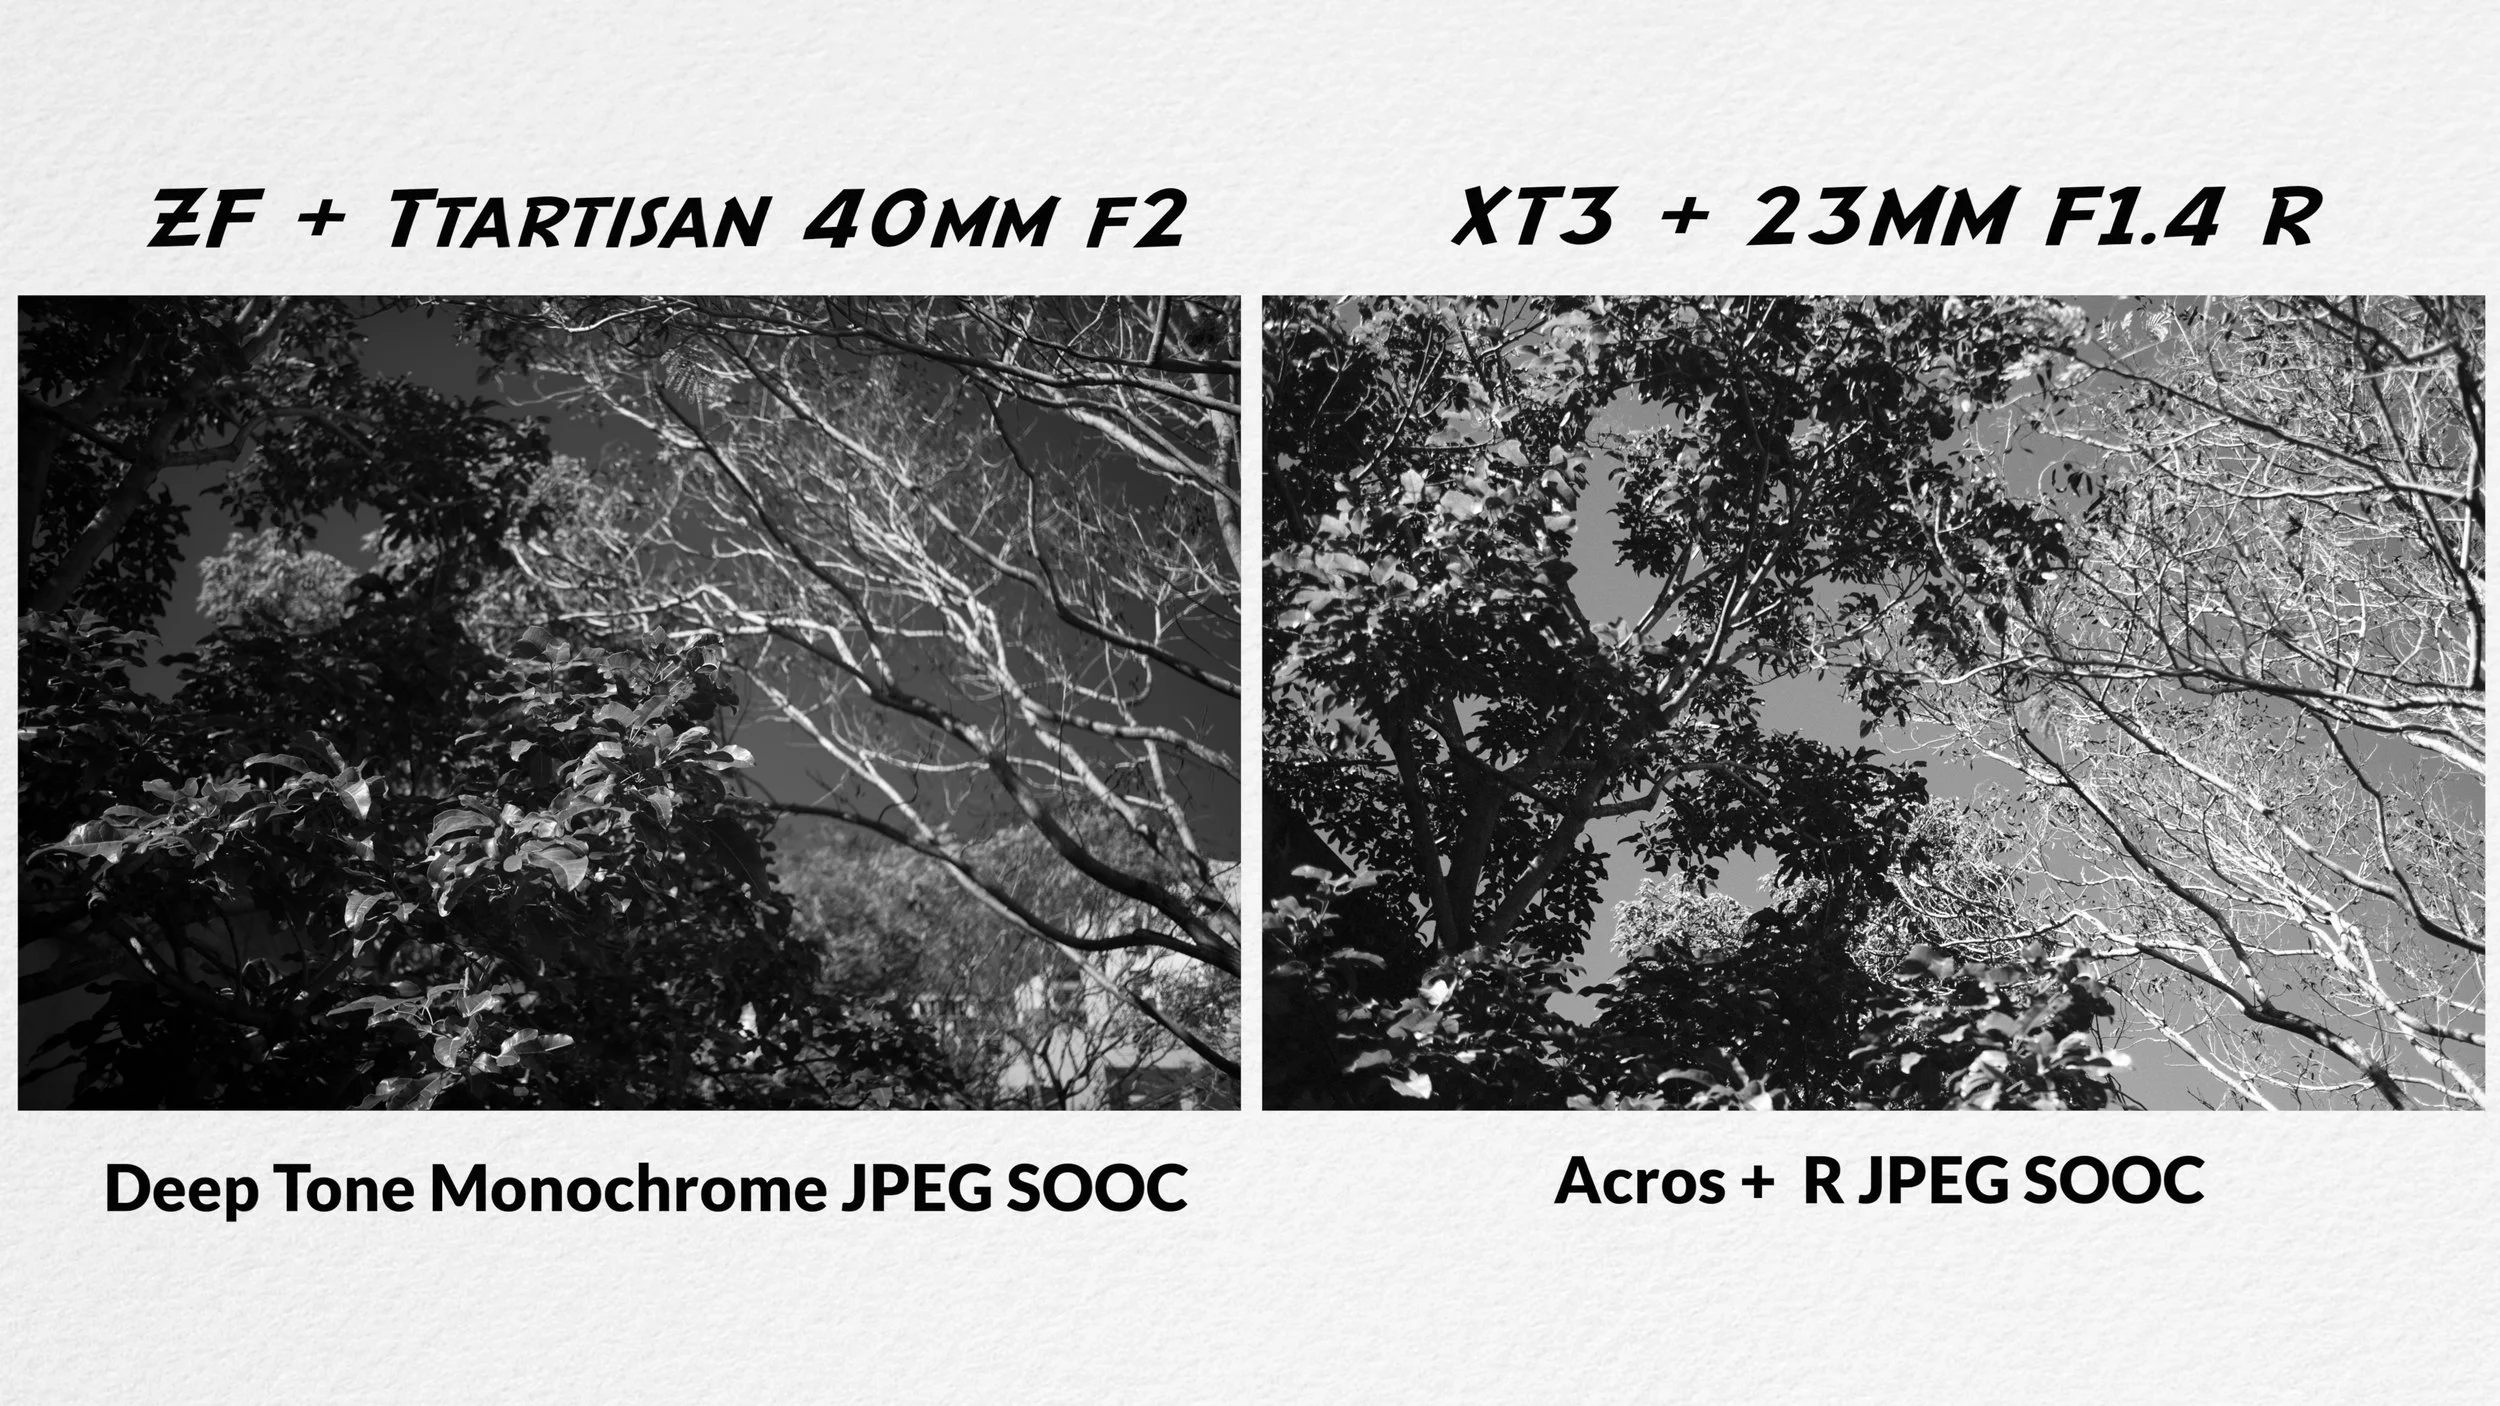
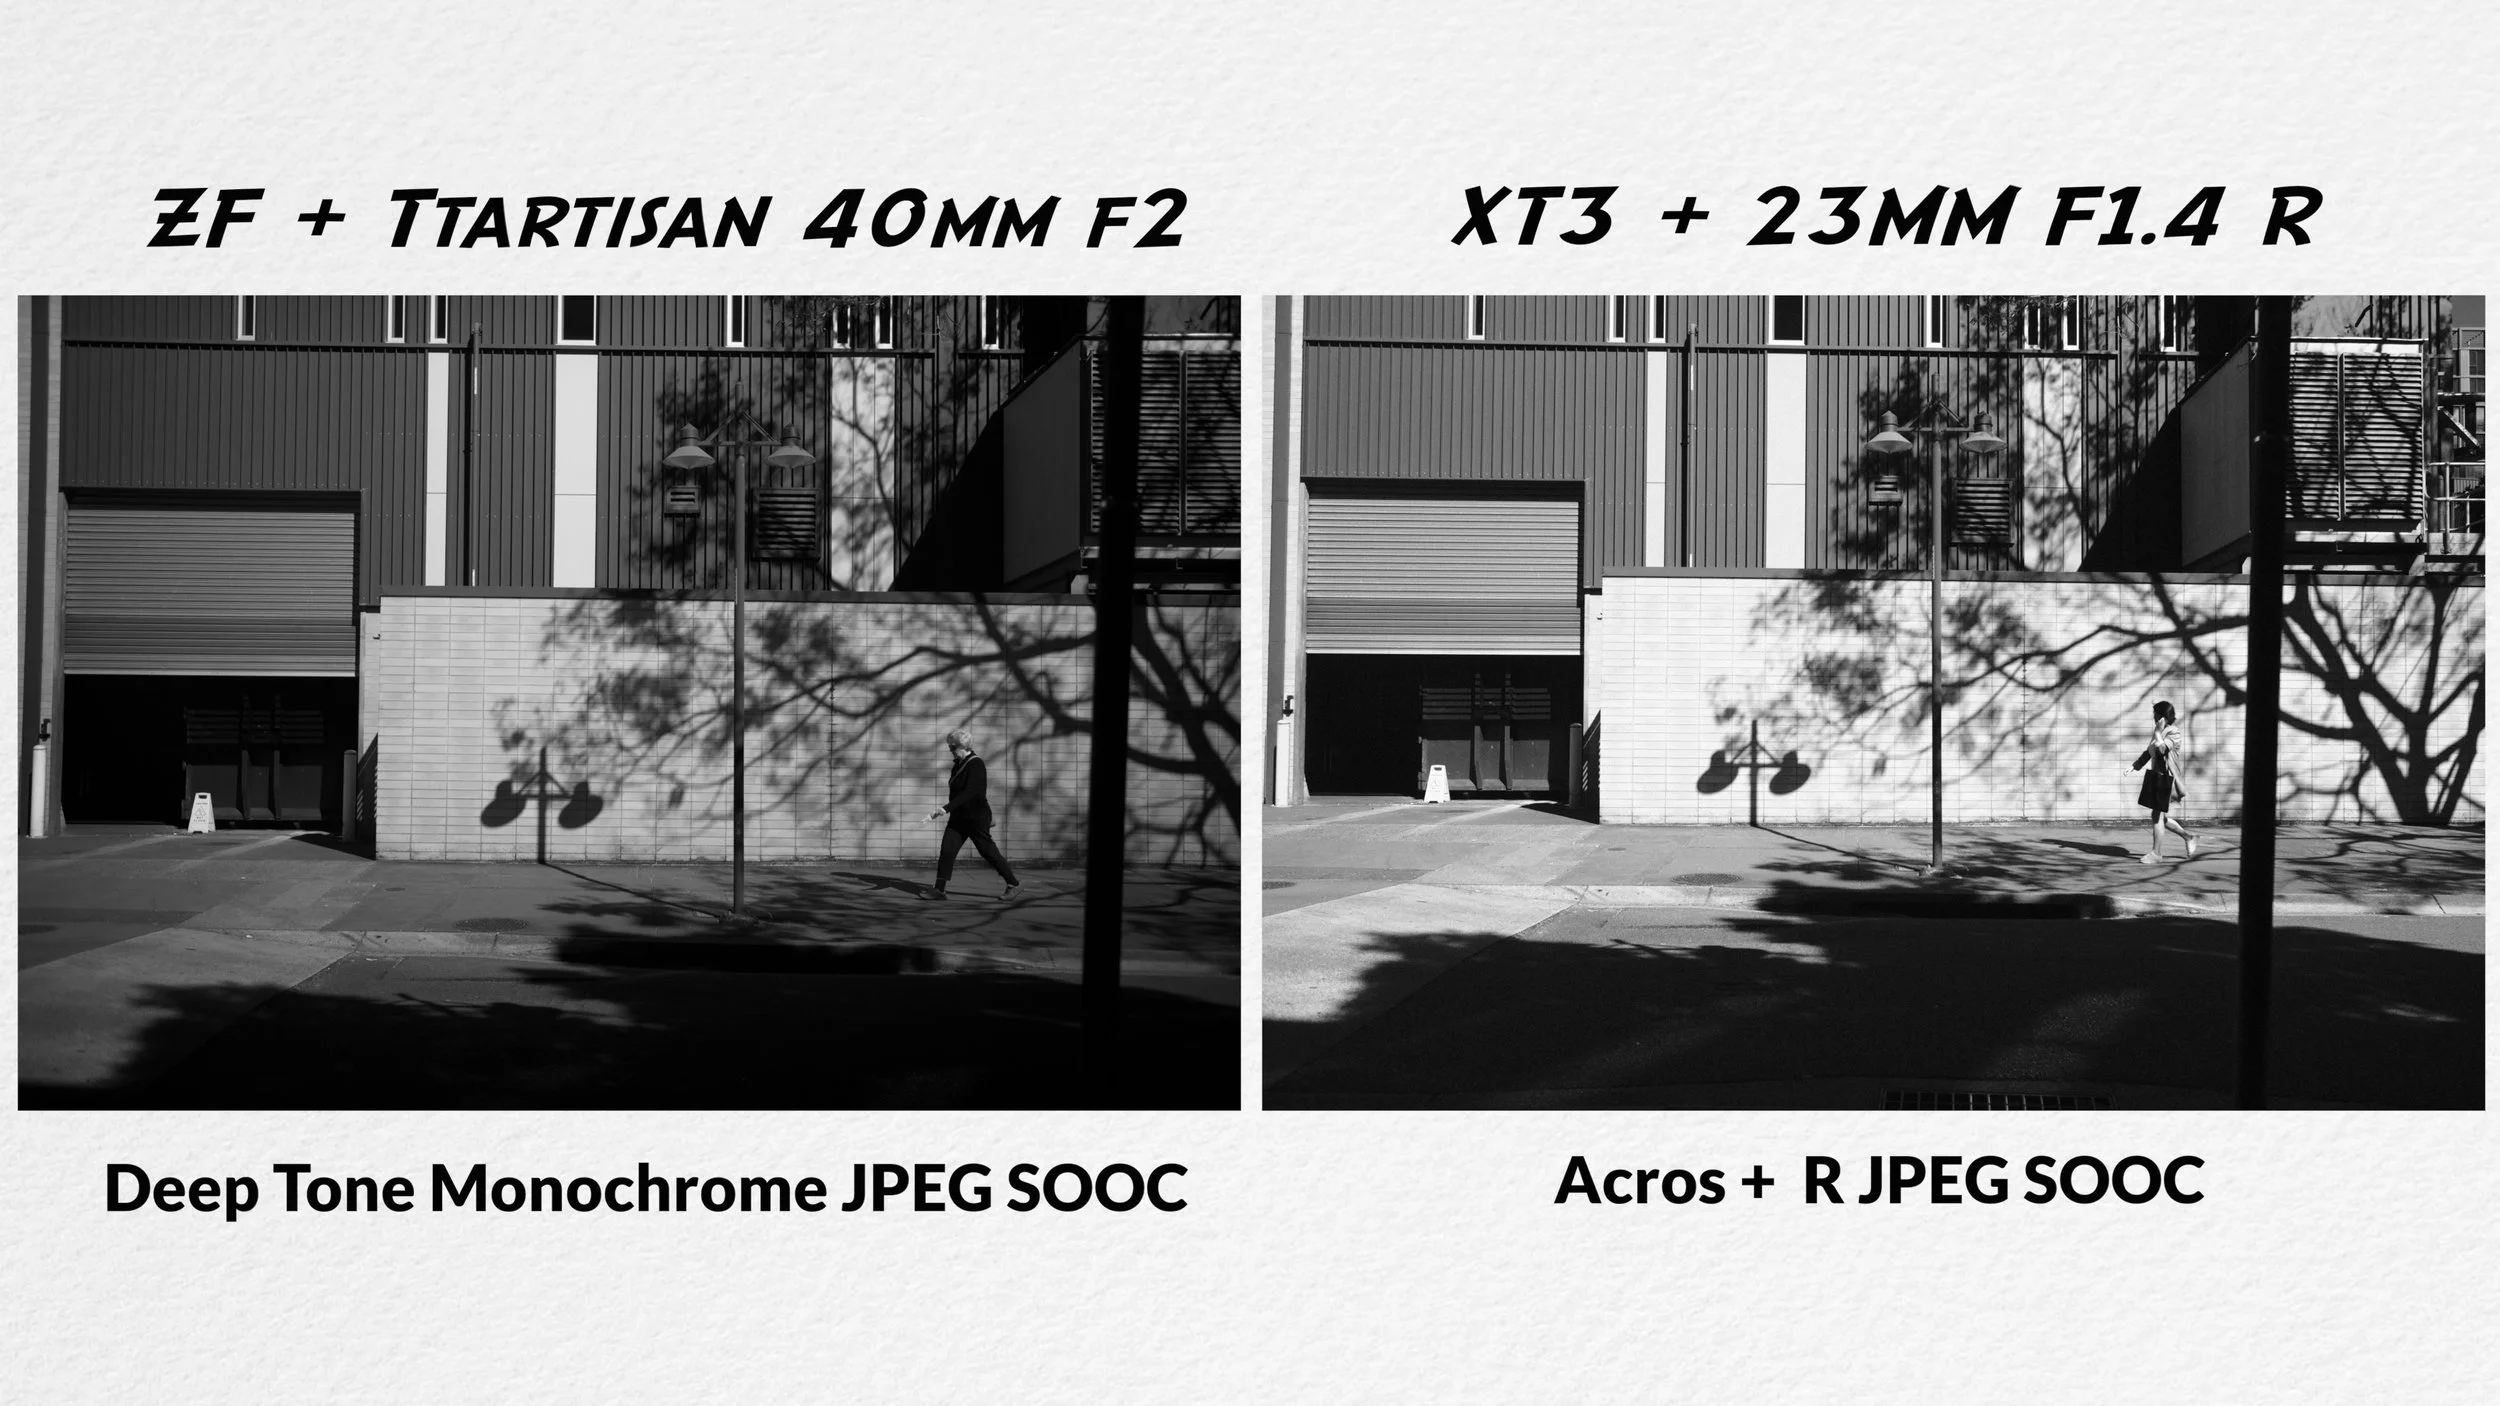
You can see the recipes look quite different, it’s not just the exposure, both cameras were set to matrix metering, exposure compensation of -0.3, but the most notable difference is a setting you can’t change on the Zf:
3. Grain
Fujifilm lets you apply different grain strengths, but this not yet available on the Zf. It’s coming via firmware to coincide with the release of the Silver ZF?
For now you’ll need to add it in lightroom or crank the ISO past 6400. Deep Tone Monochrome on the Zf looks more digital without it, maybe that’s why out of the 110 creator recipes published on Nikon’s imaging cloud, only 4 so far are black and white. How about the OM3?

On the OM3 you can add 3 different film grain options, and to my eye the weakest grain setting looks the most organic. On this second photowalk I’m using 17mm on the OM3, 23mm on the XT3, for a neutral 35mm perspective - but the OM3’s monochrome rendering is anything but neutral.
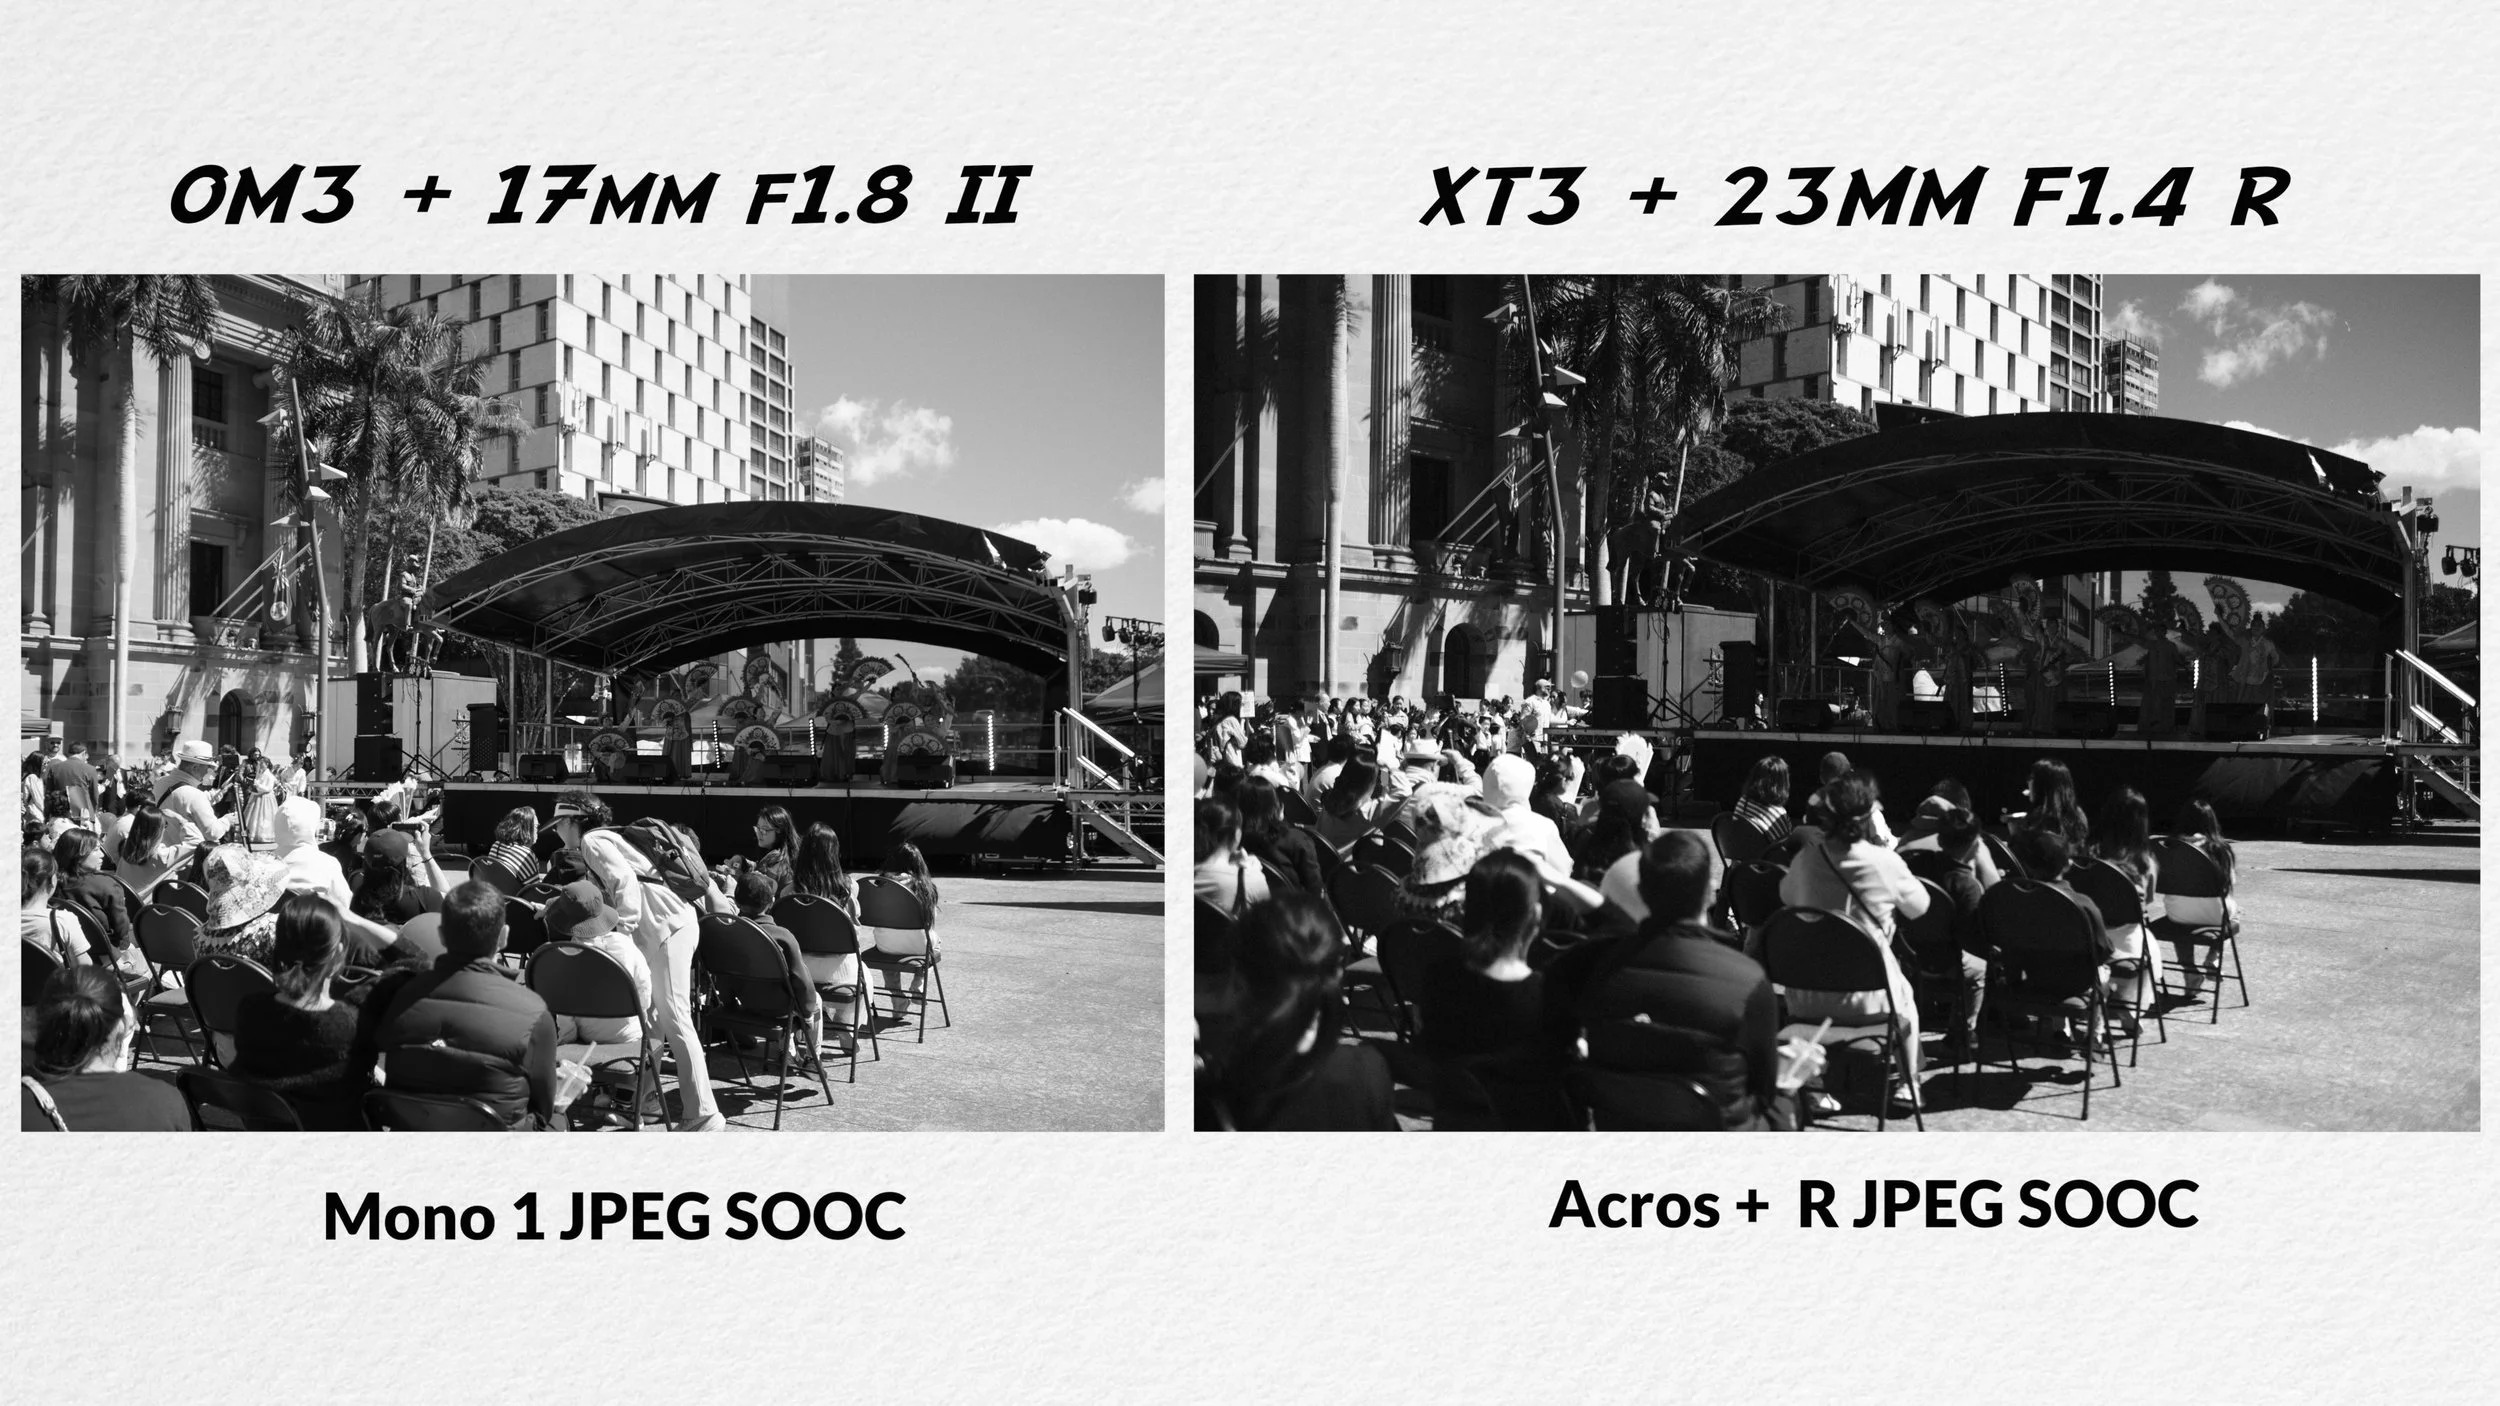
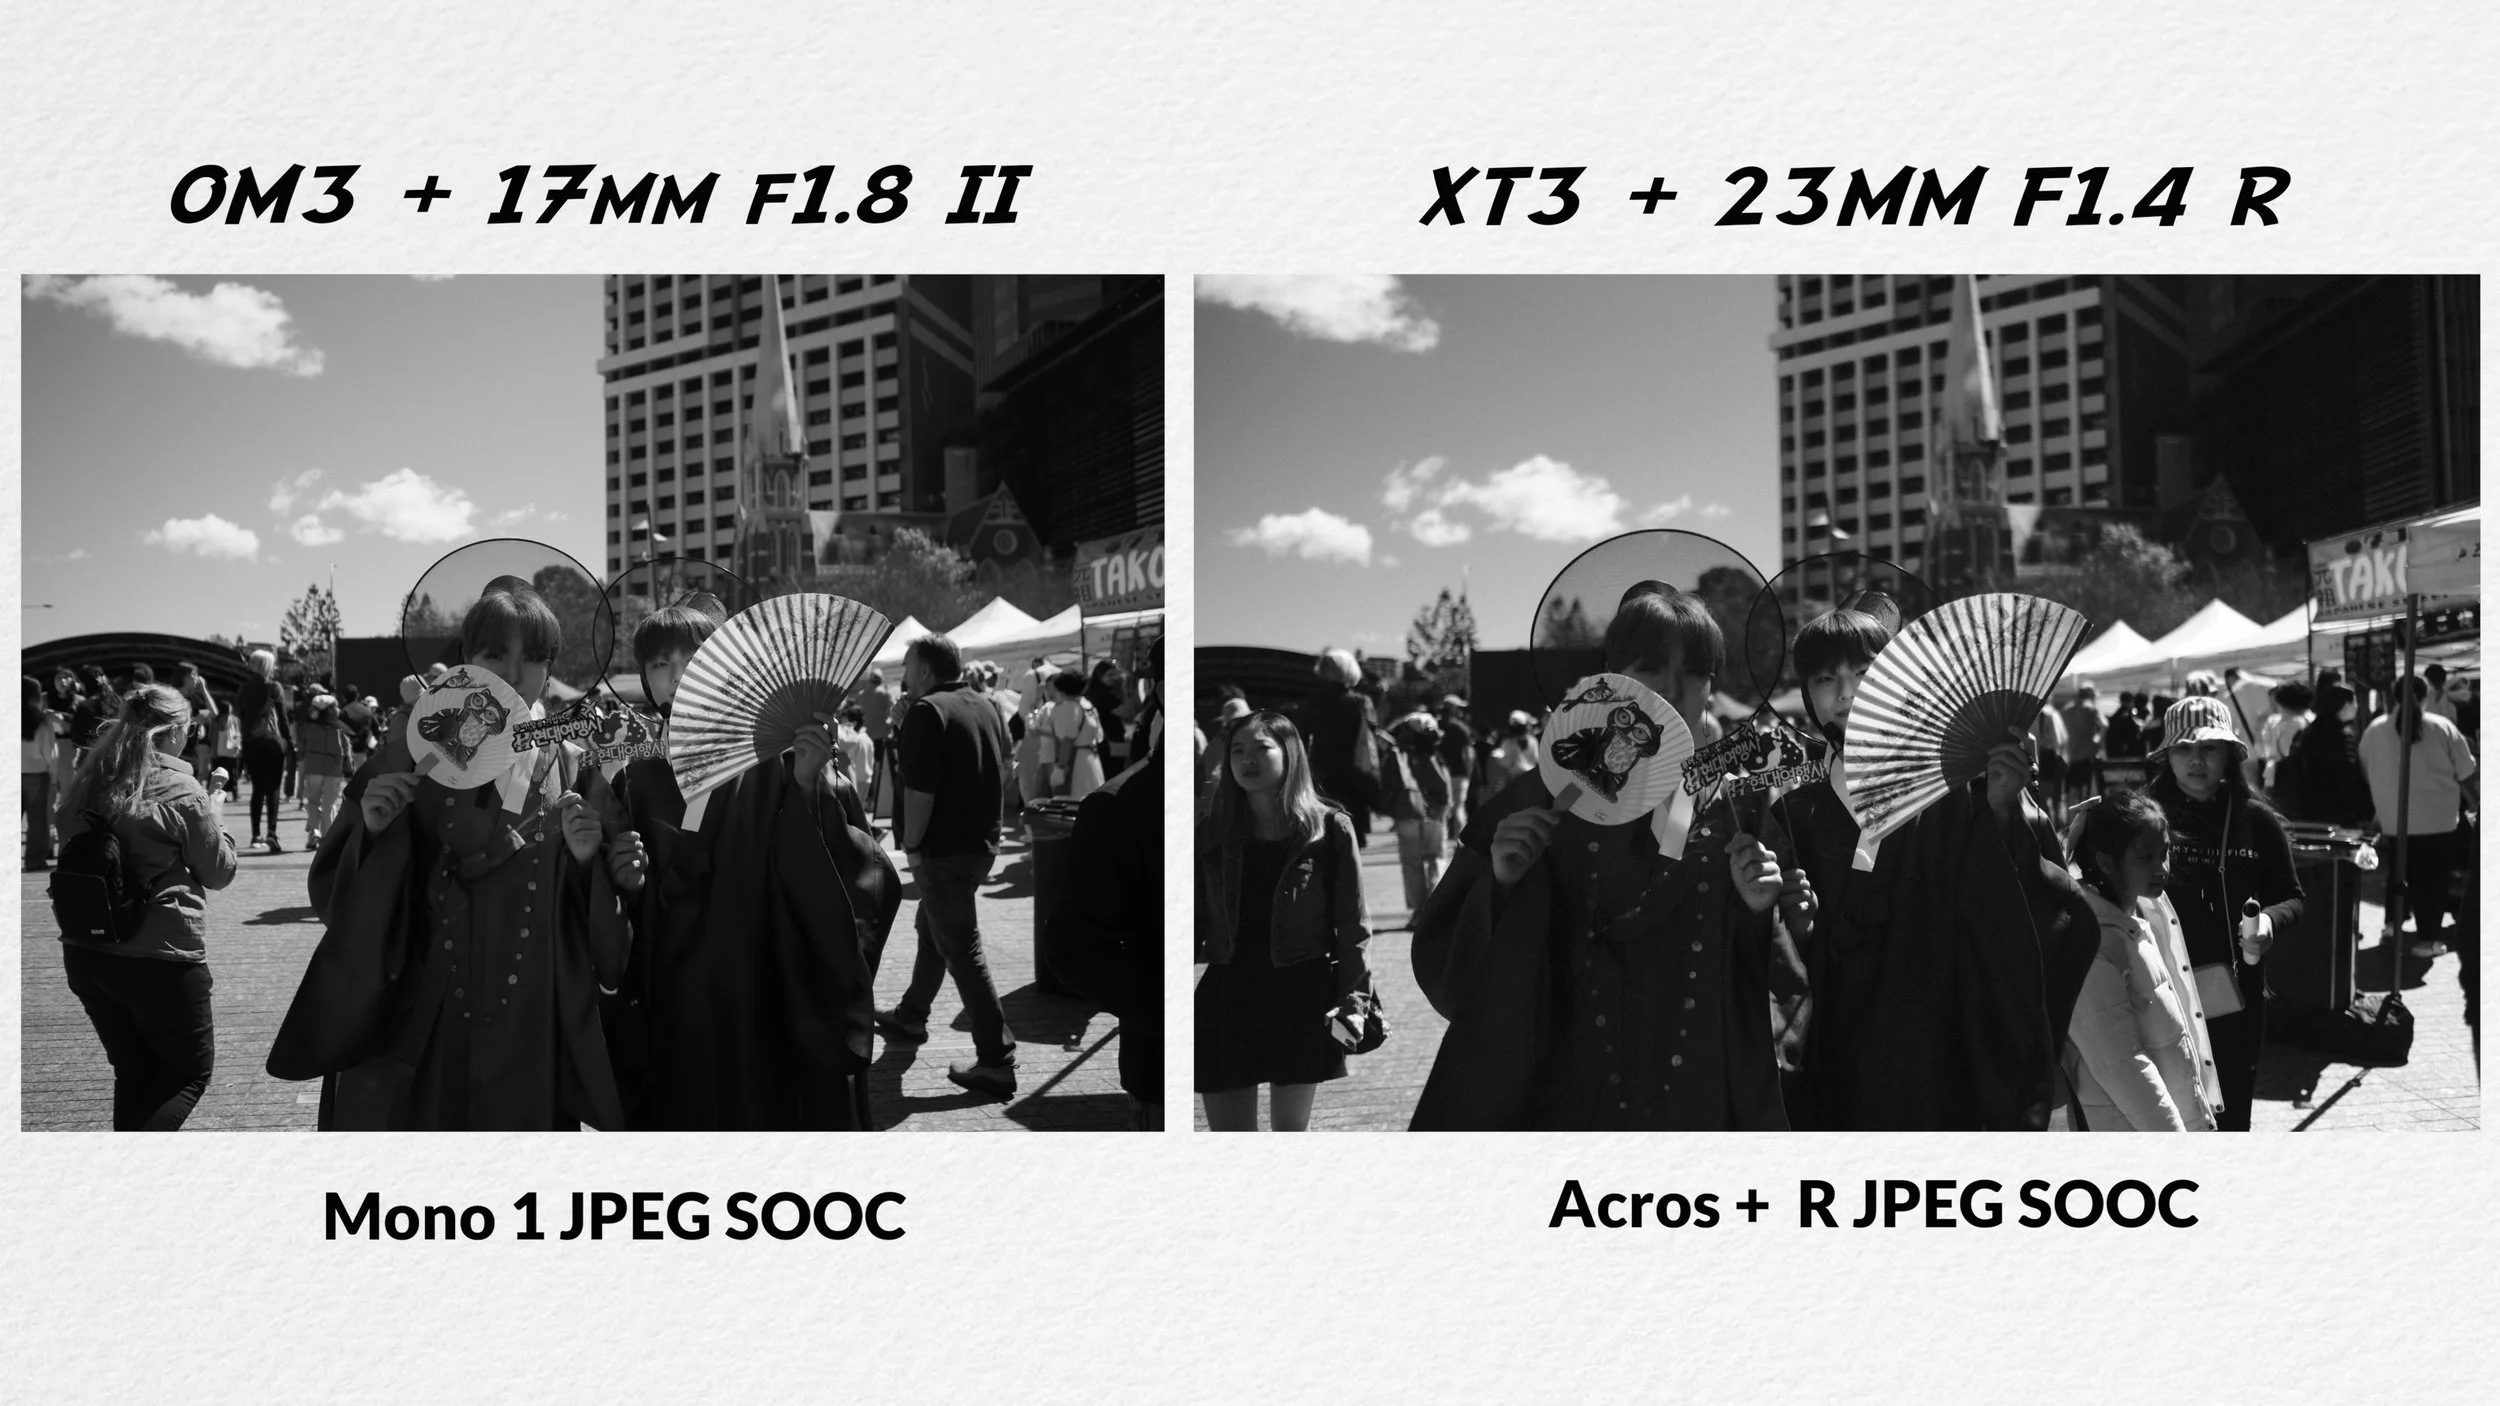
The OM3’s mono JPEGs - sharpness and contrast to -1, everything else at default - look closer to Fuji’s Acros than Nikon’s deeptone monochrome. The highlight roll-off for crop sensors - micro four thirds and APS-C, more closely match each other than the full-frame Zf, yet this weakness becomes a strength for urban monochrome shooting. Less dynamic range means both bright and dark quickly disappear into highlights or shadows, letting the geometry of the scene come to the foreground.

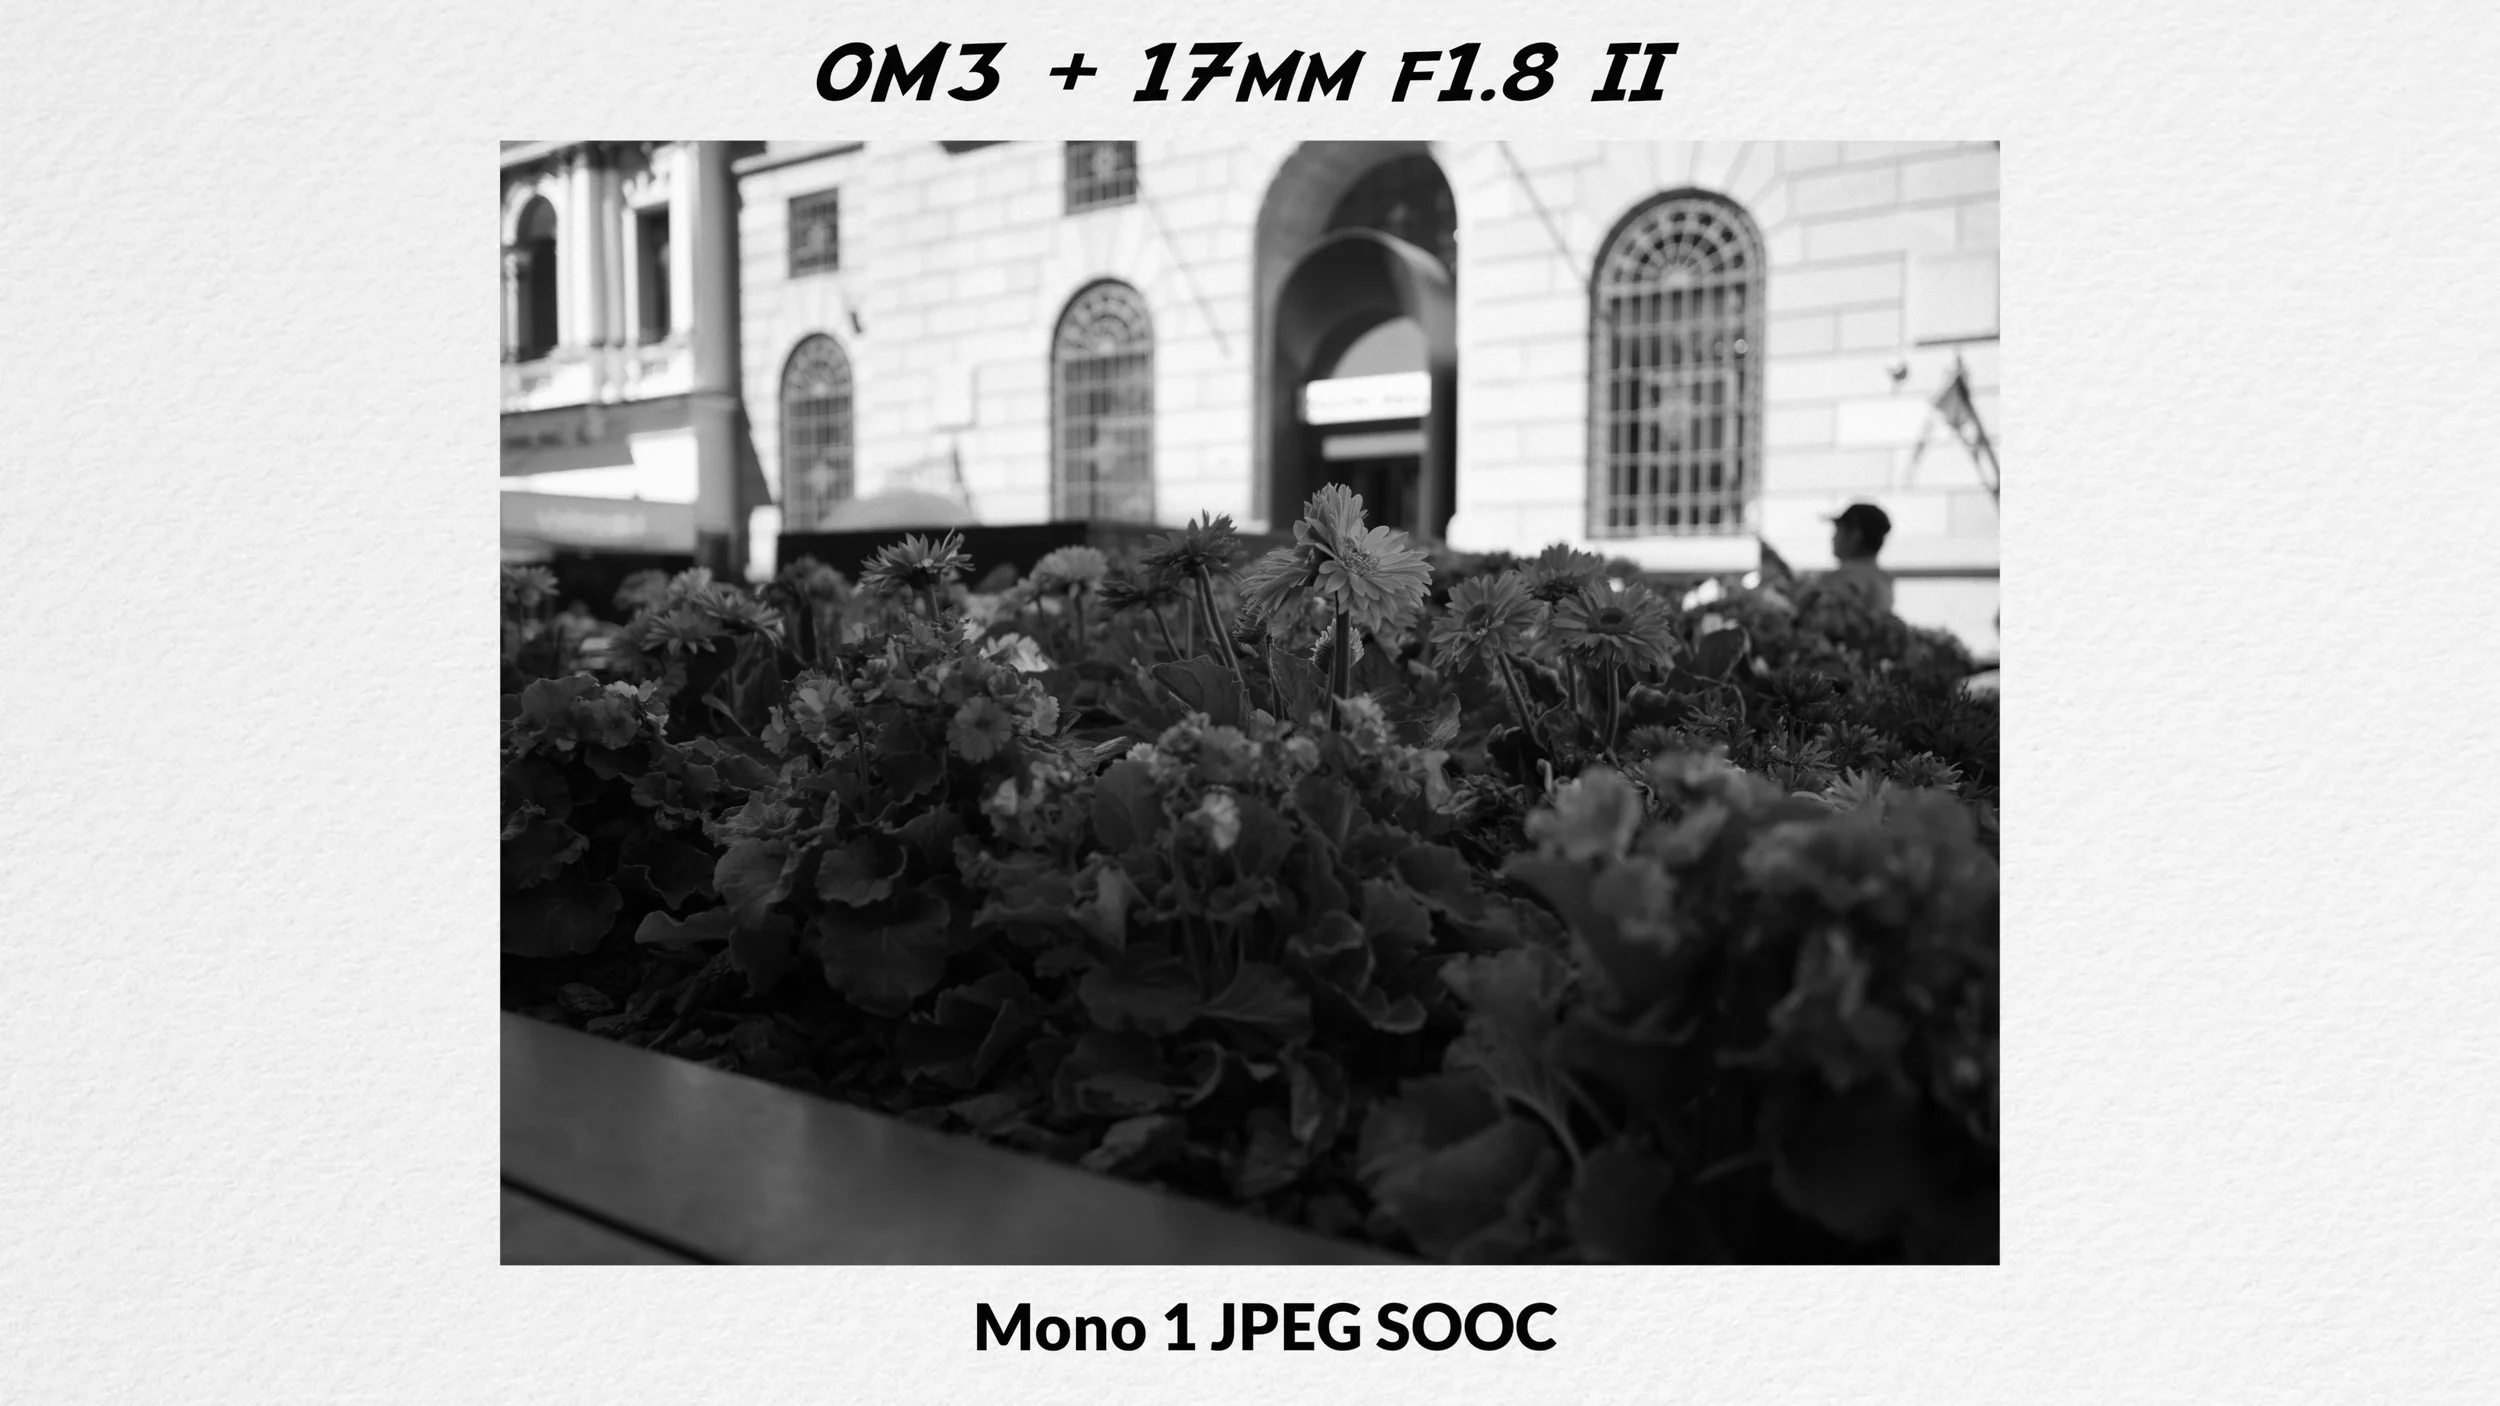
If you prefer a more subtle, nuanced look - it comes down separation in the mid-tones, and you can get this in camera through color contrast. Opposing tones on the color wheel will create different tones of grey in the middle of the histogram, while the extreme whites and blacks fall on either side.

The flowers in the foreground will render out different tones of grey in monochrome
This is much easier to do in lightroom if you shoot raw; doing this for JPEGs in camera is hard. Unless your camera has:
4: Curves
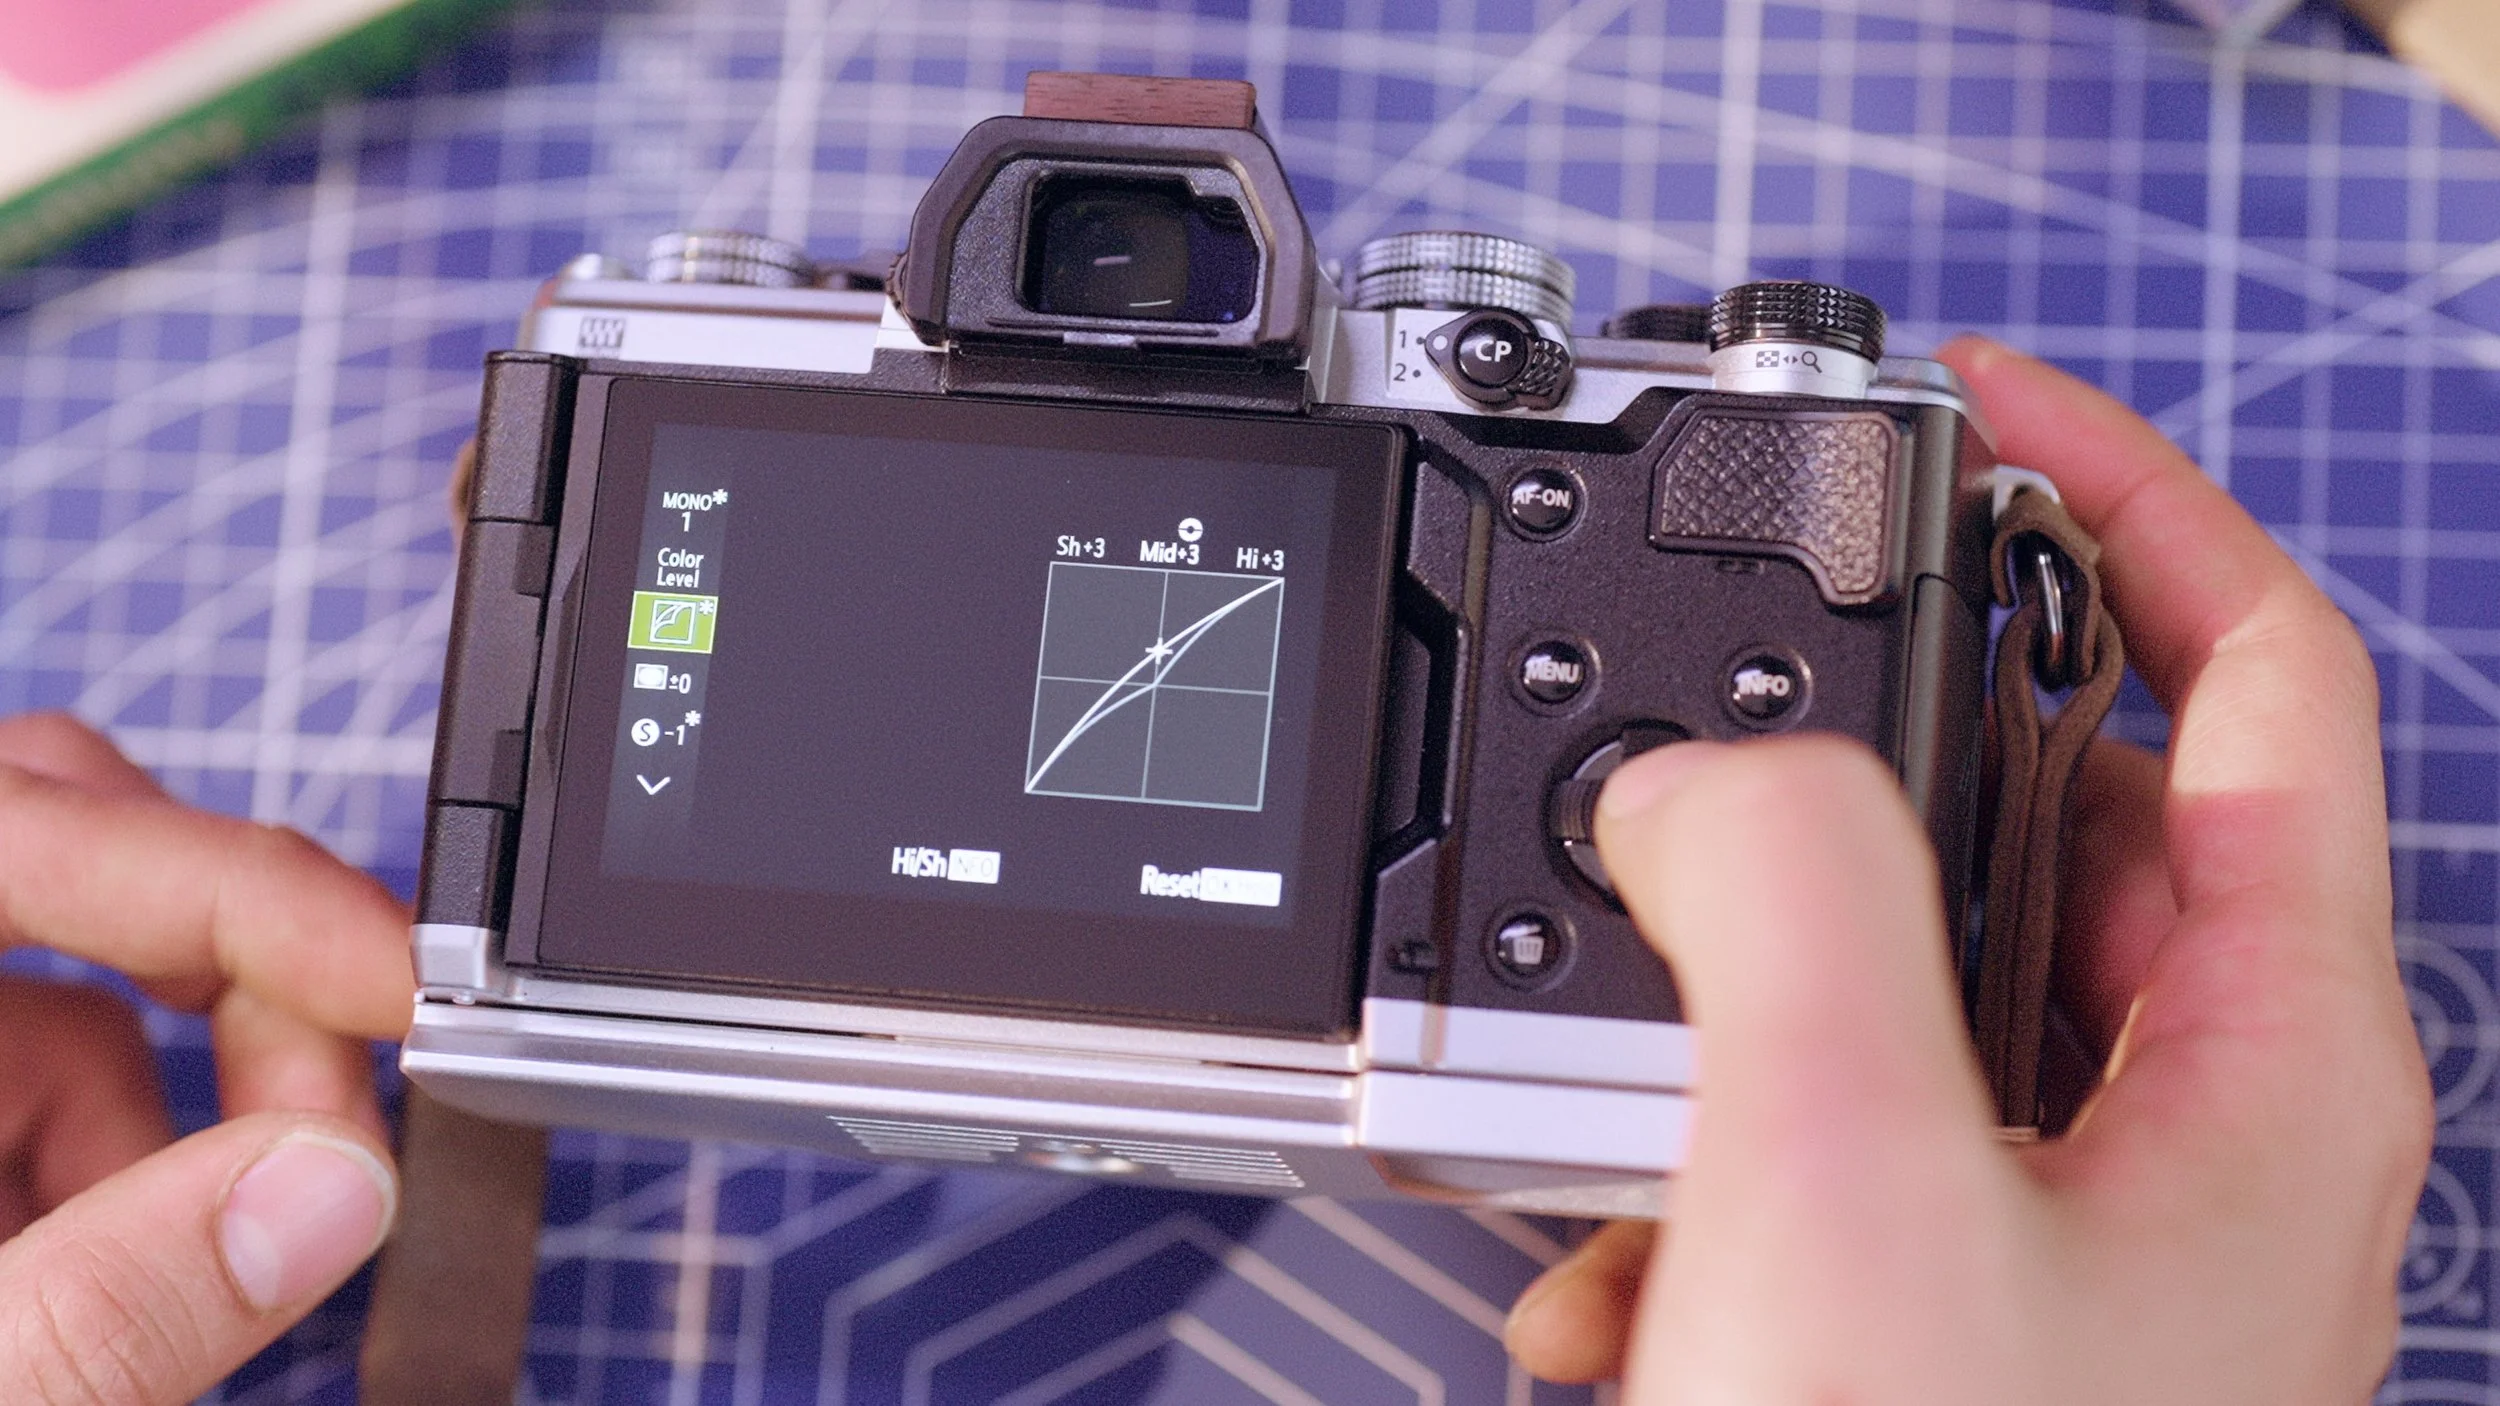
Curves give you so much more control - Fuji lets you control the highlights and shadows, but the OM3 does one better - you can affect the midtones.
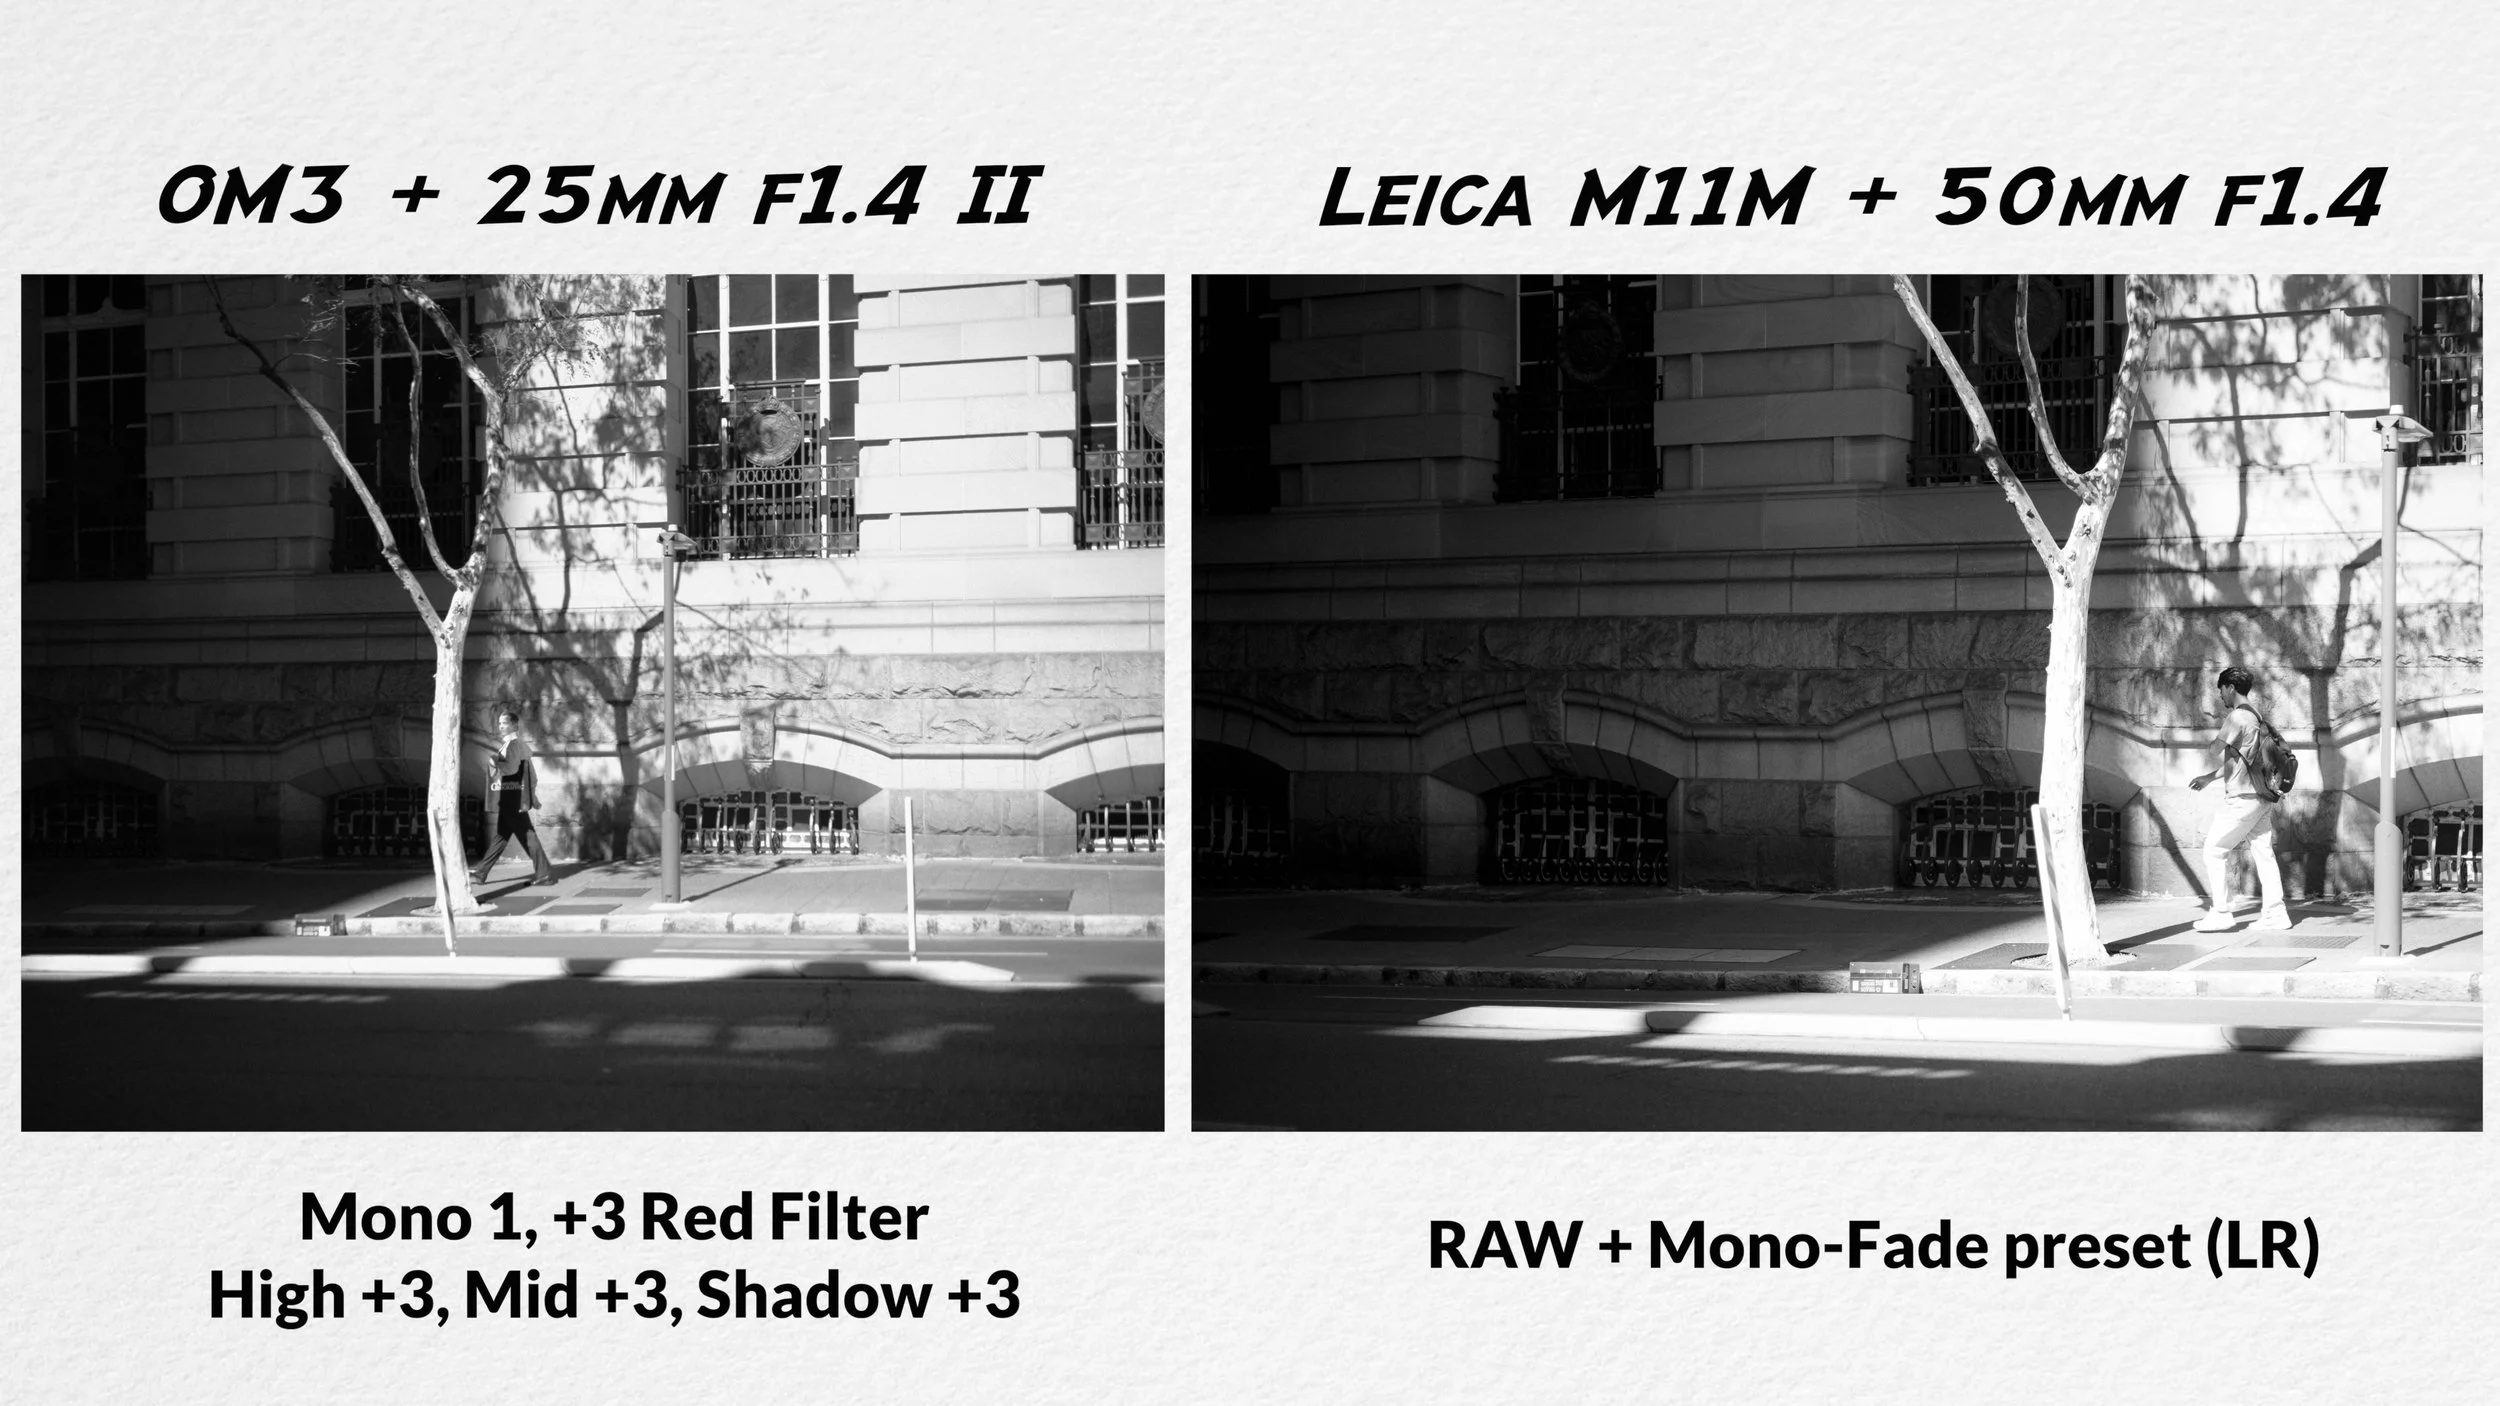
This is where the “look” varies wildly based on taste. I love a good crunchy S-curve for a gritty urban look, but to better match the lenses I’m using on this third photowalk - the Panaleica 25mm 1.4 on the OM3, the Leica M11 Monochrome and the 50 1.4 summilux, I want a nostalgic low contrast vibe.

This blog and post is sponsor-free. If you’d like to support my work please consider purchasing gear through my affiliate links. To make this post and the associated video this is the gear I used:
TTArtisan 35mm External Optical viewfinder: https://geni.us/EMETPg
OM 17mm 1.8 ii: https://geni.us/dKGUpZ
Panasonic Leica 25mm f1.4 ii: https://geni.us/jtVR
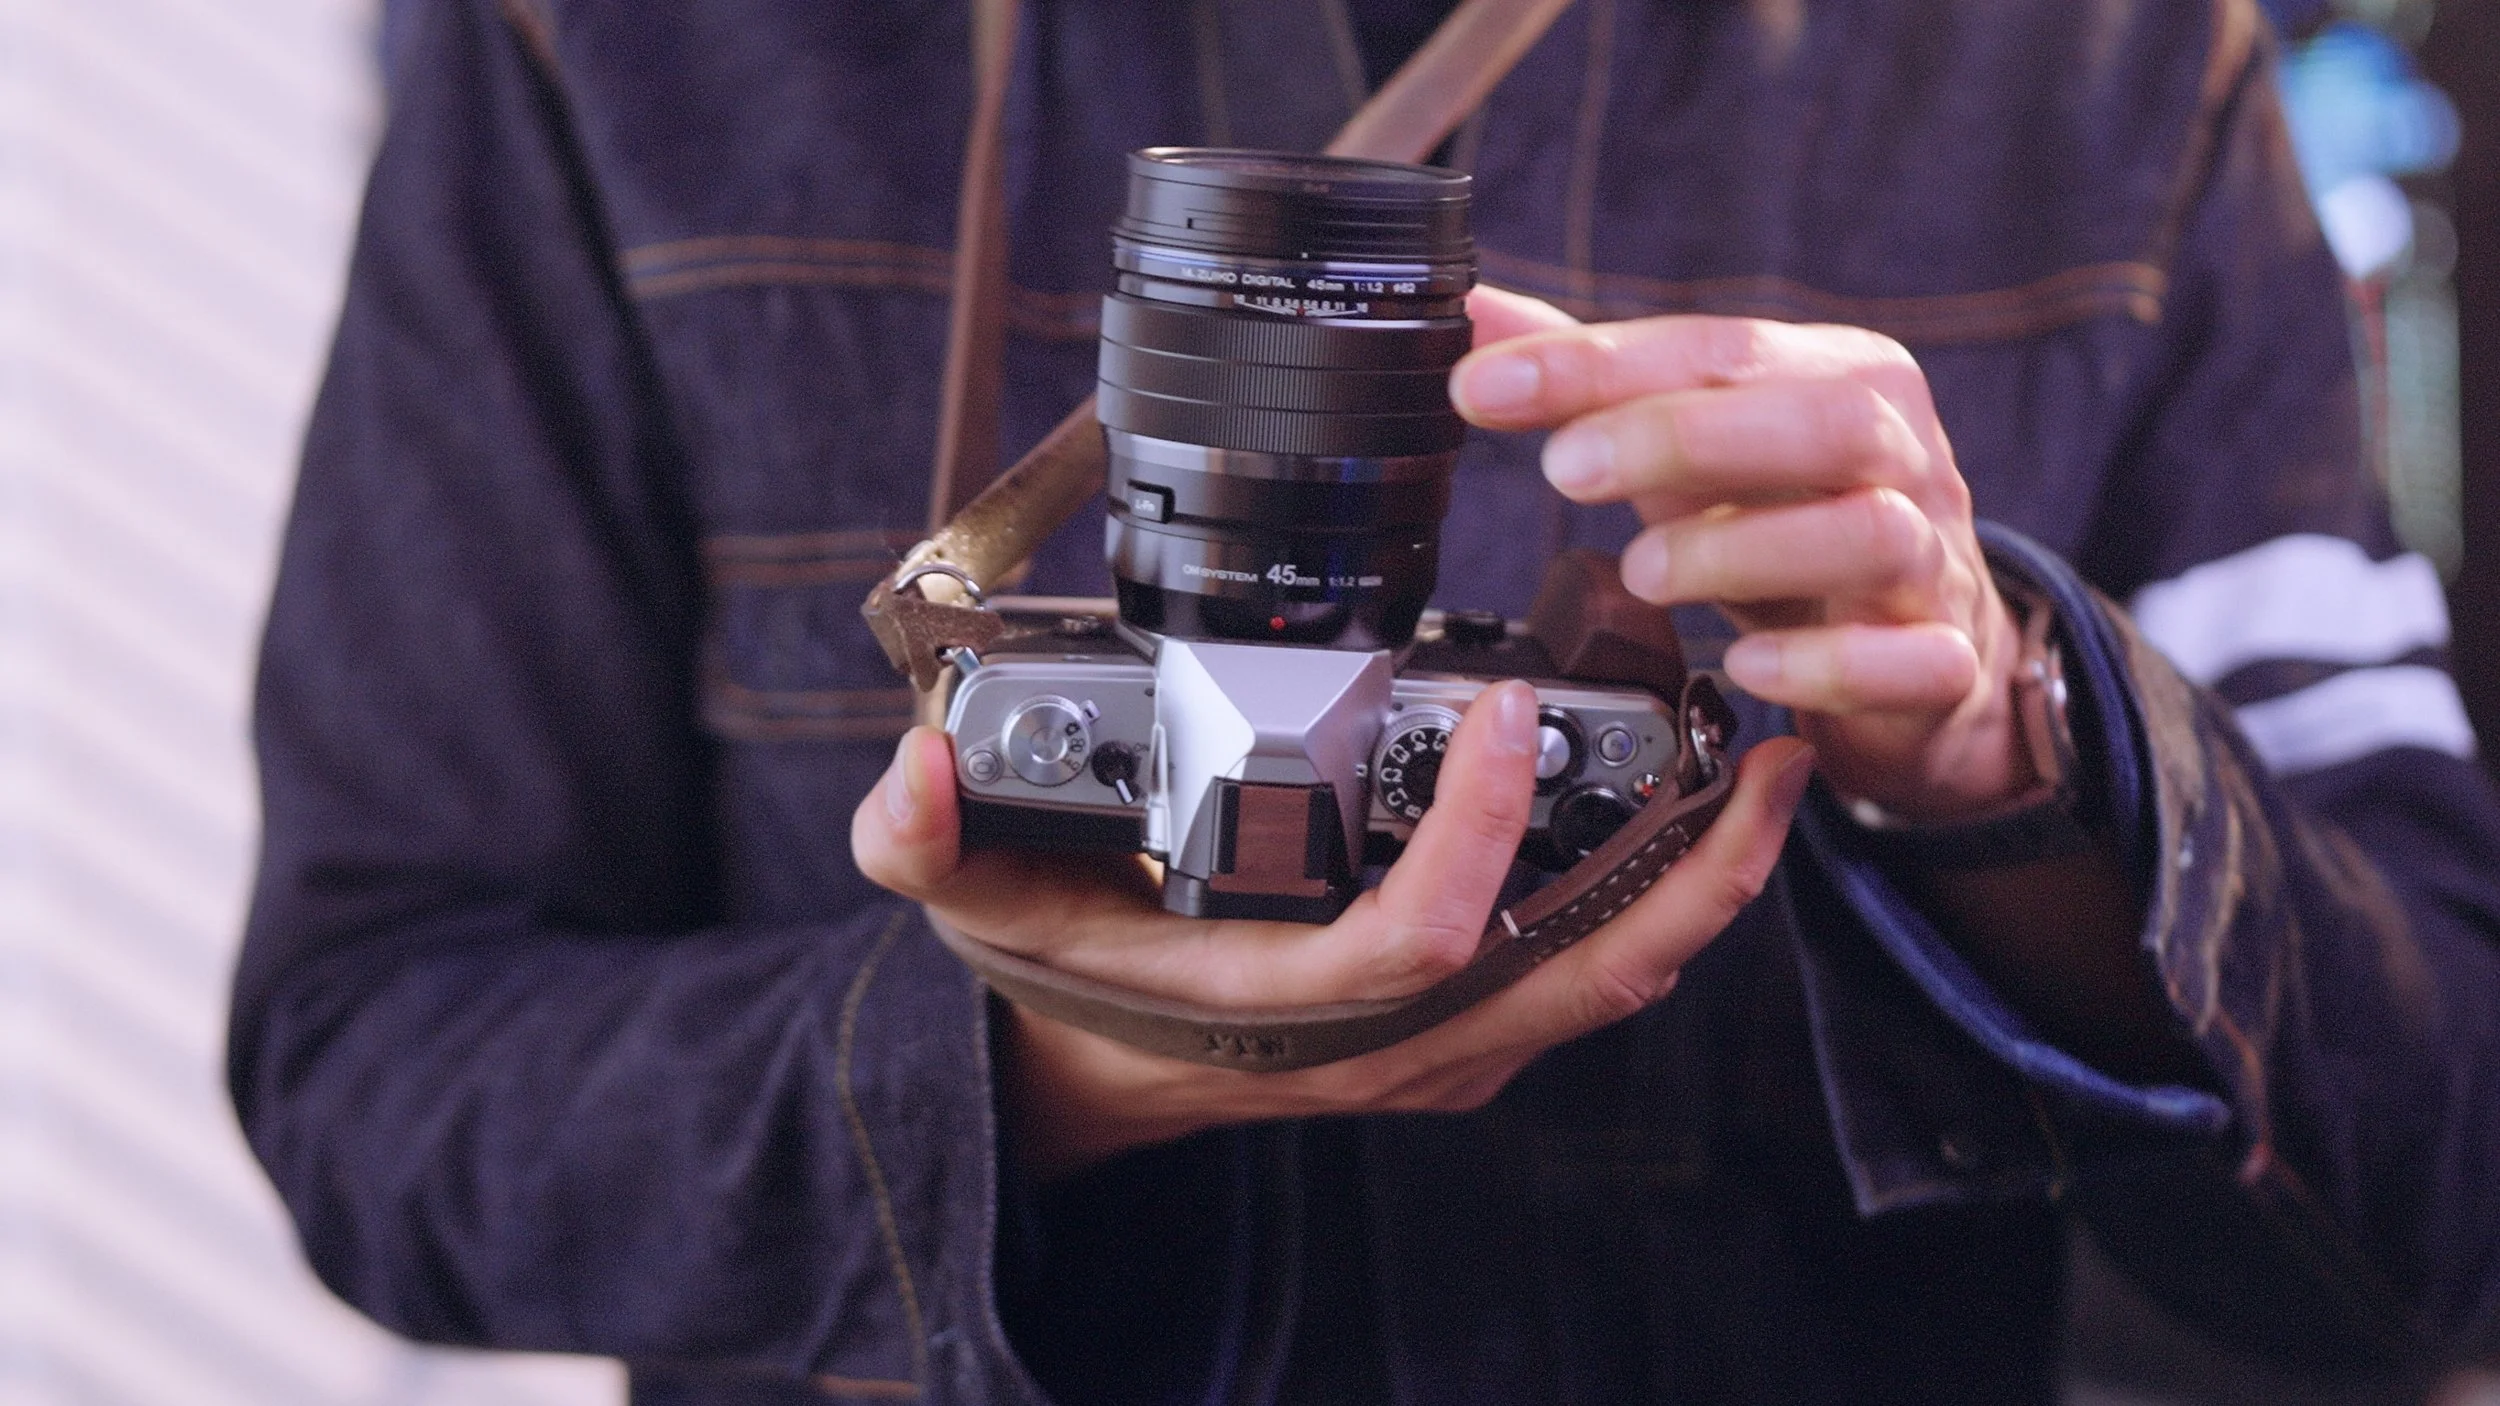
OM 45mm f1.2 Pro: https://geni.us/g7sDe
Nikon Zf: https://geni.us/YOH8bh7
TTArtisan 40mm f2 (E/Z mount): https://geni.us/5WWDz
Nikon 40mm f2 Z: https://geni.us/0AAhXJ
Fujifilm 23mm f1.4: https://geni.us/onaO7
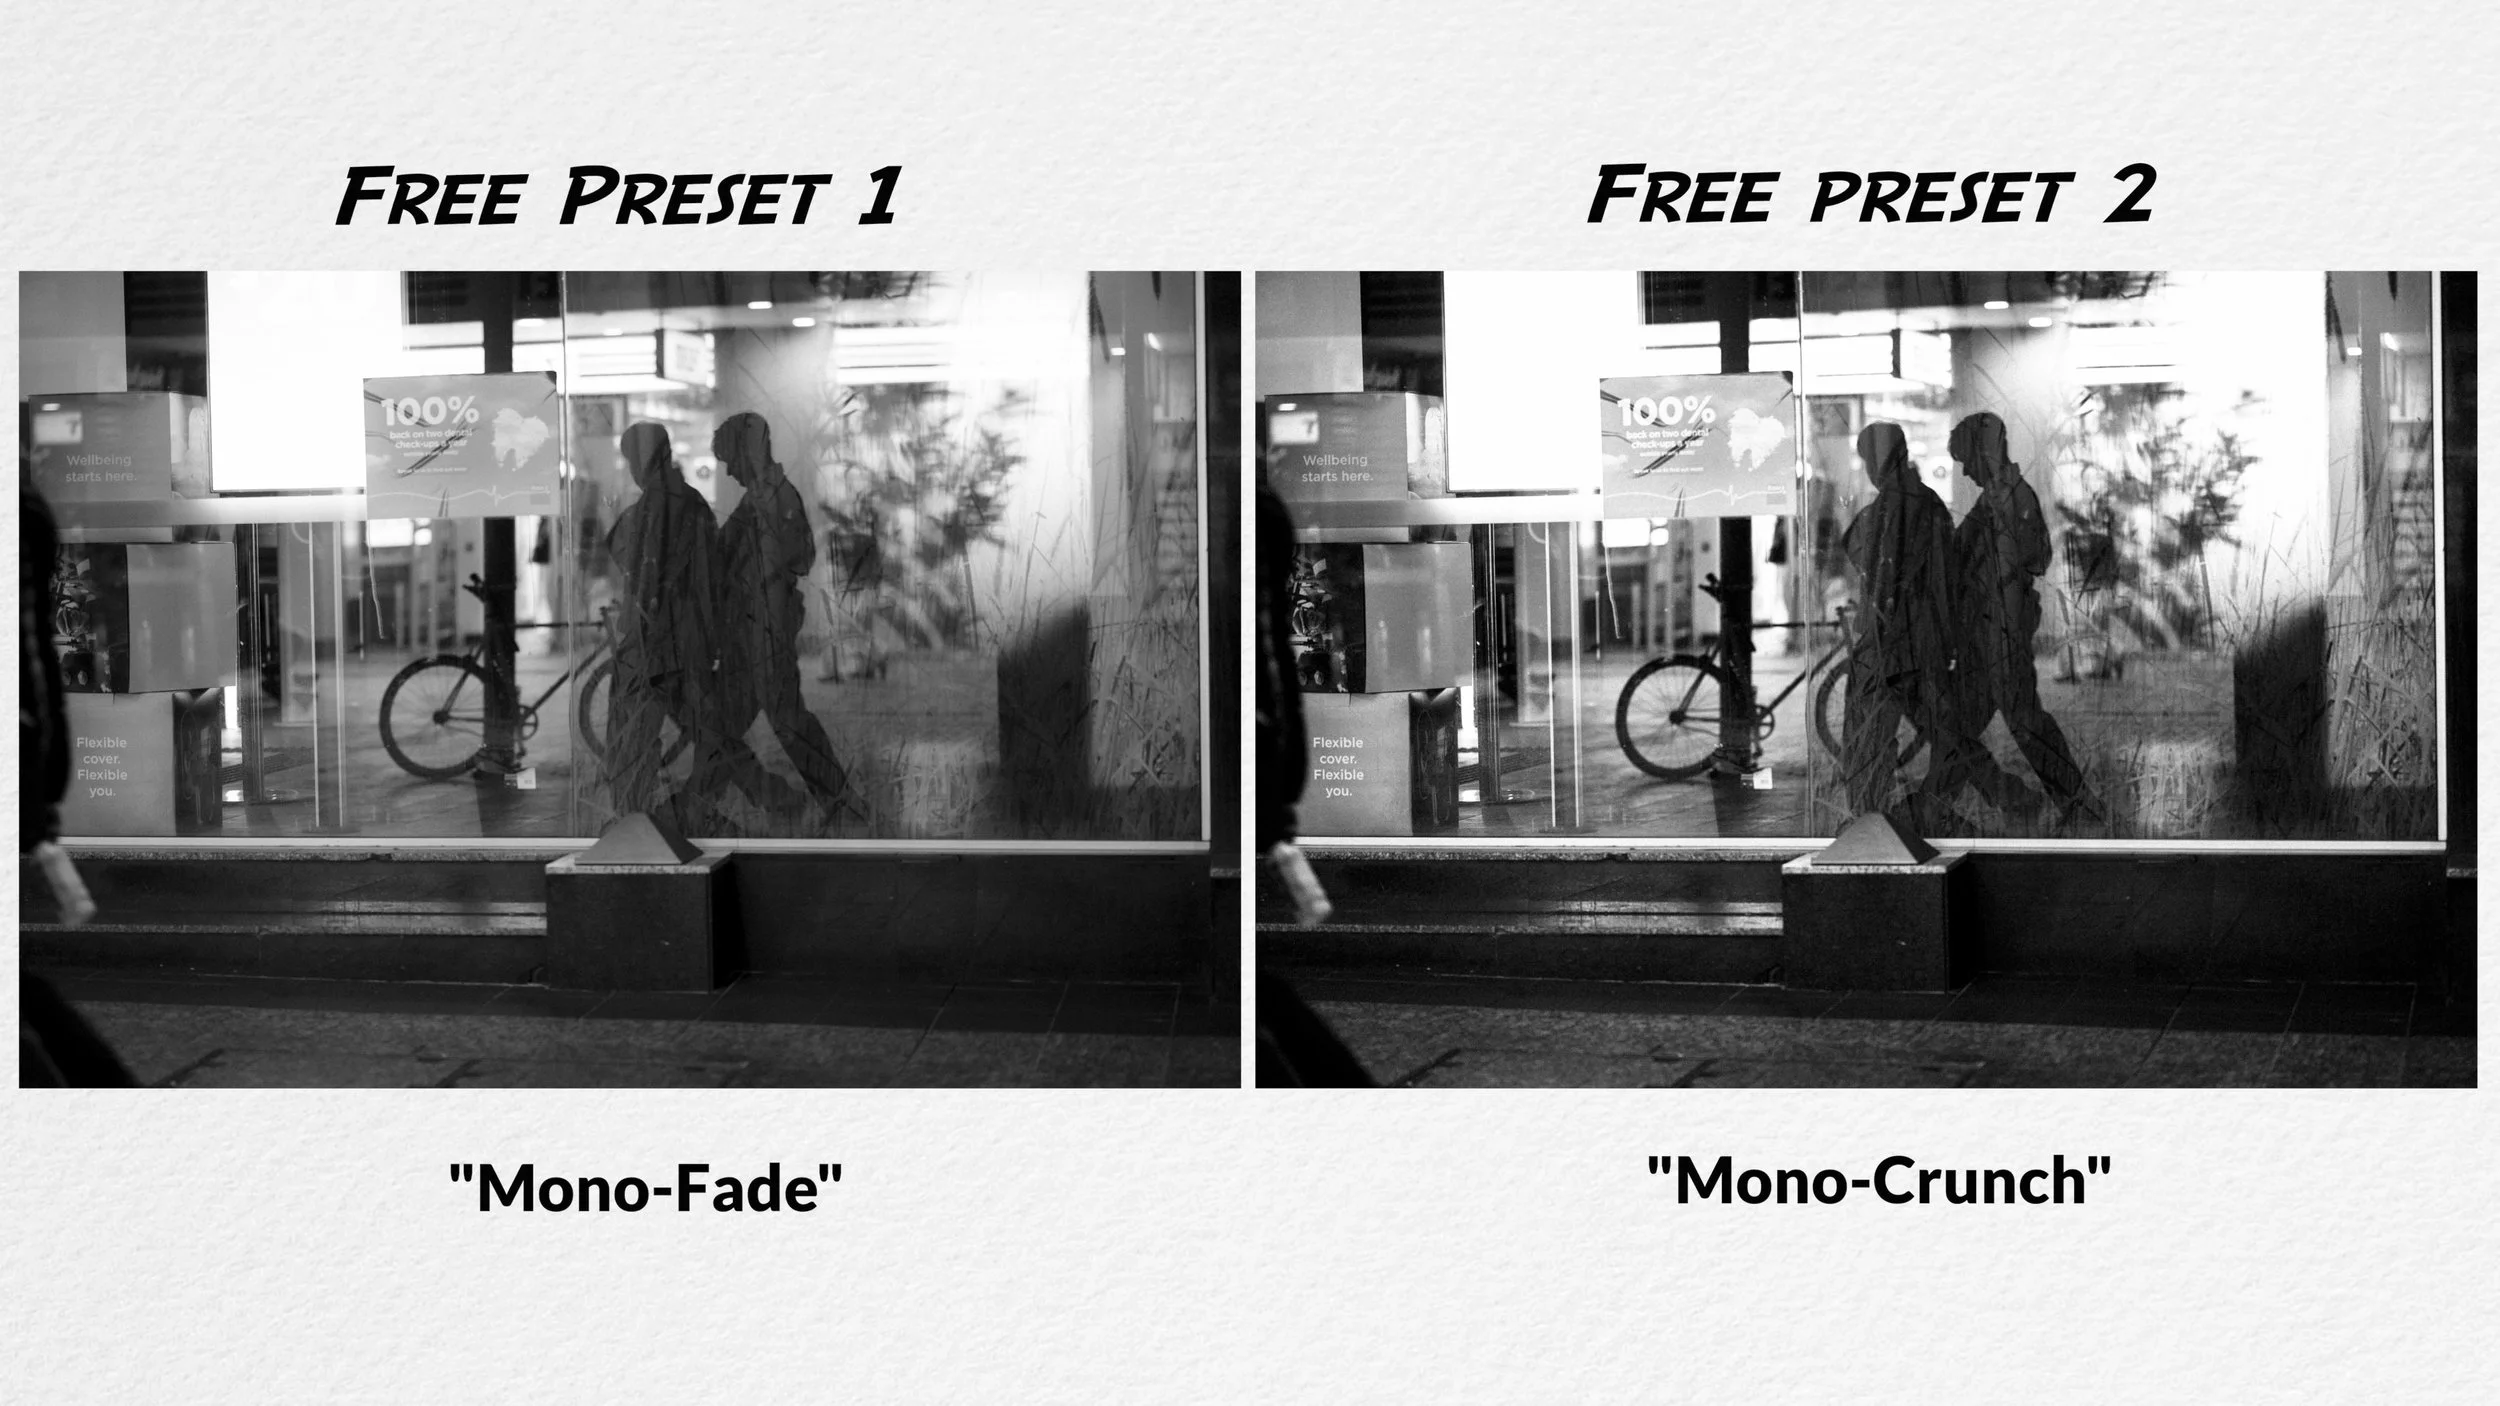
A gentle fade to lift the tones on the OM3: Highlights, midtones, shadows, all +3.
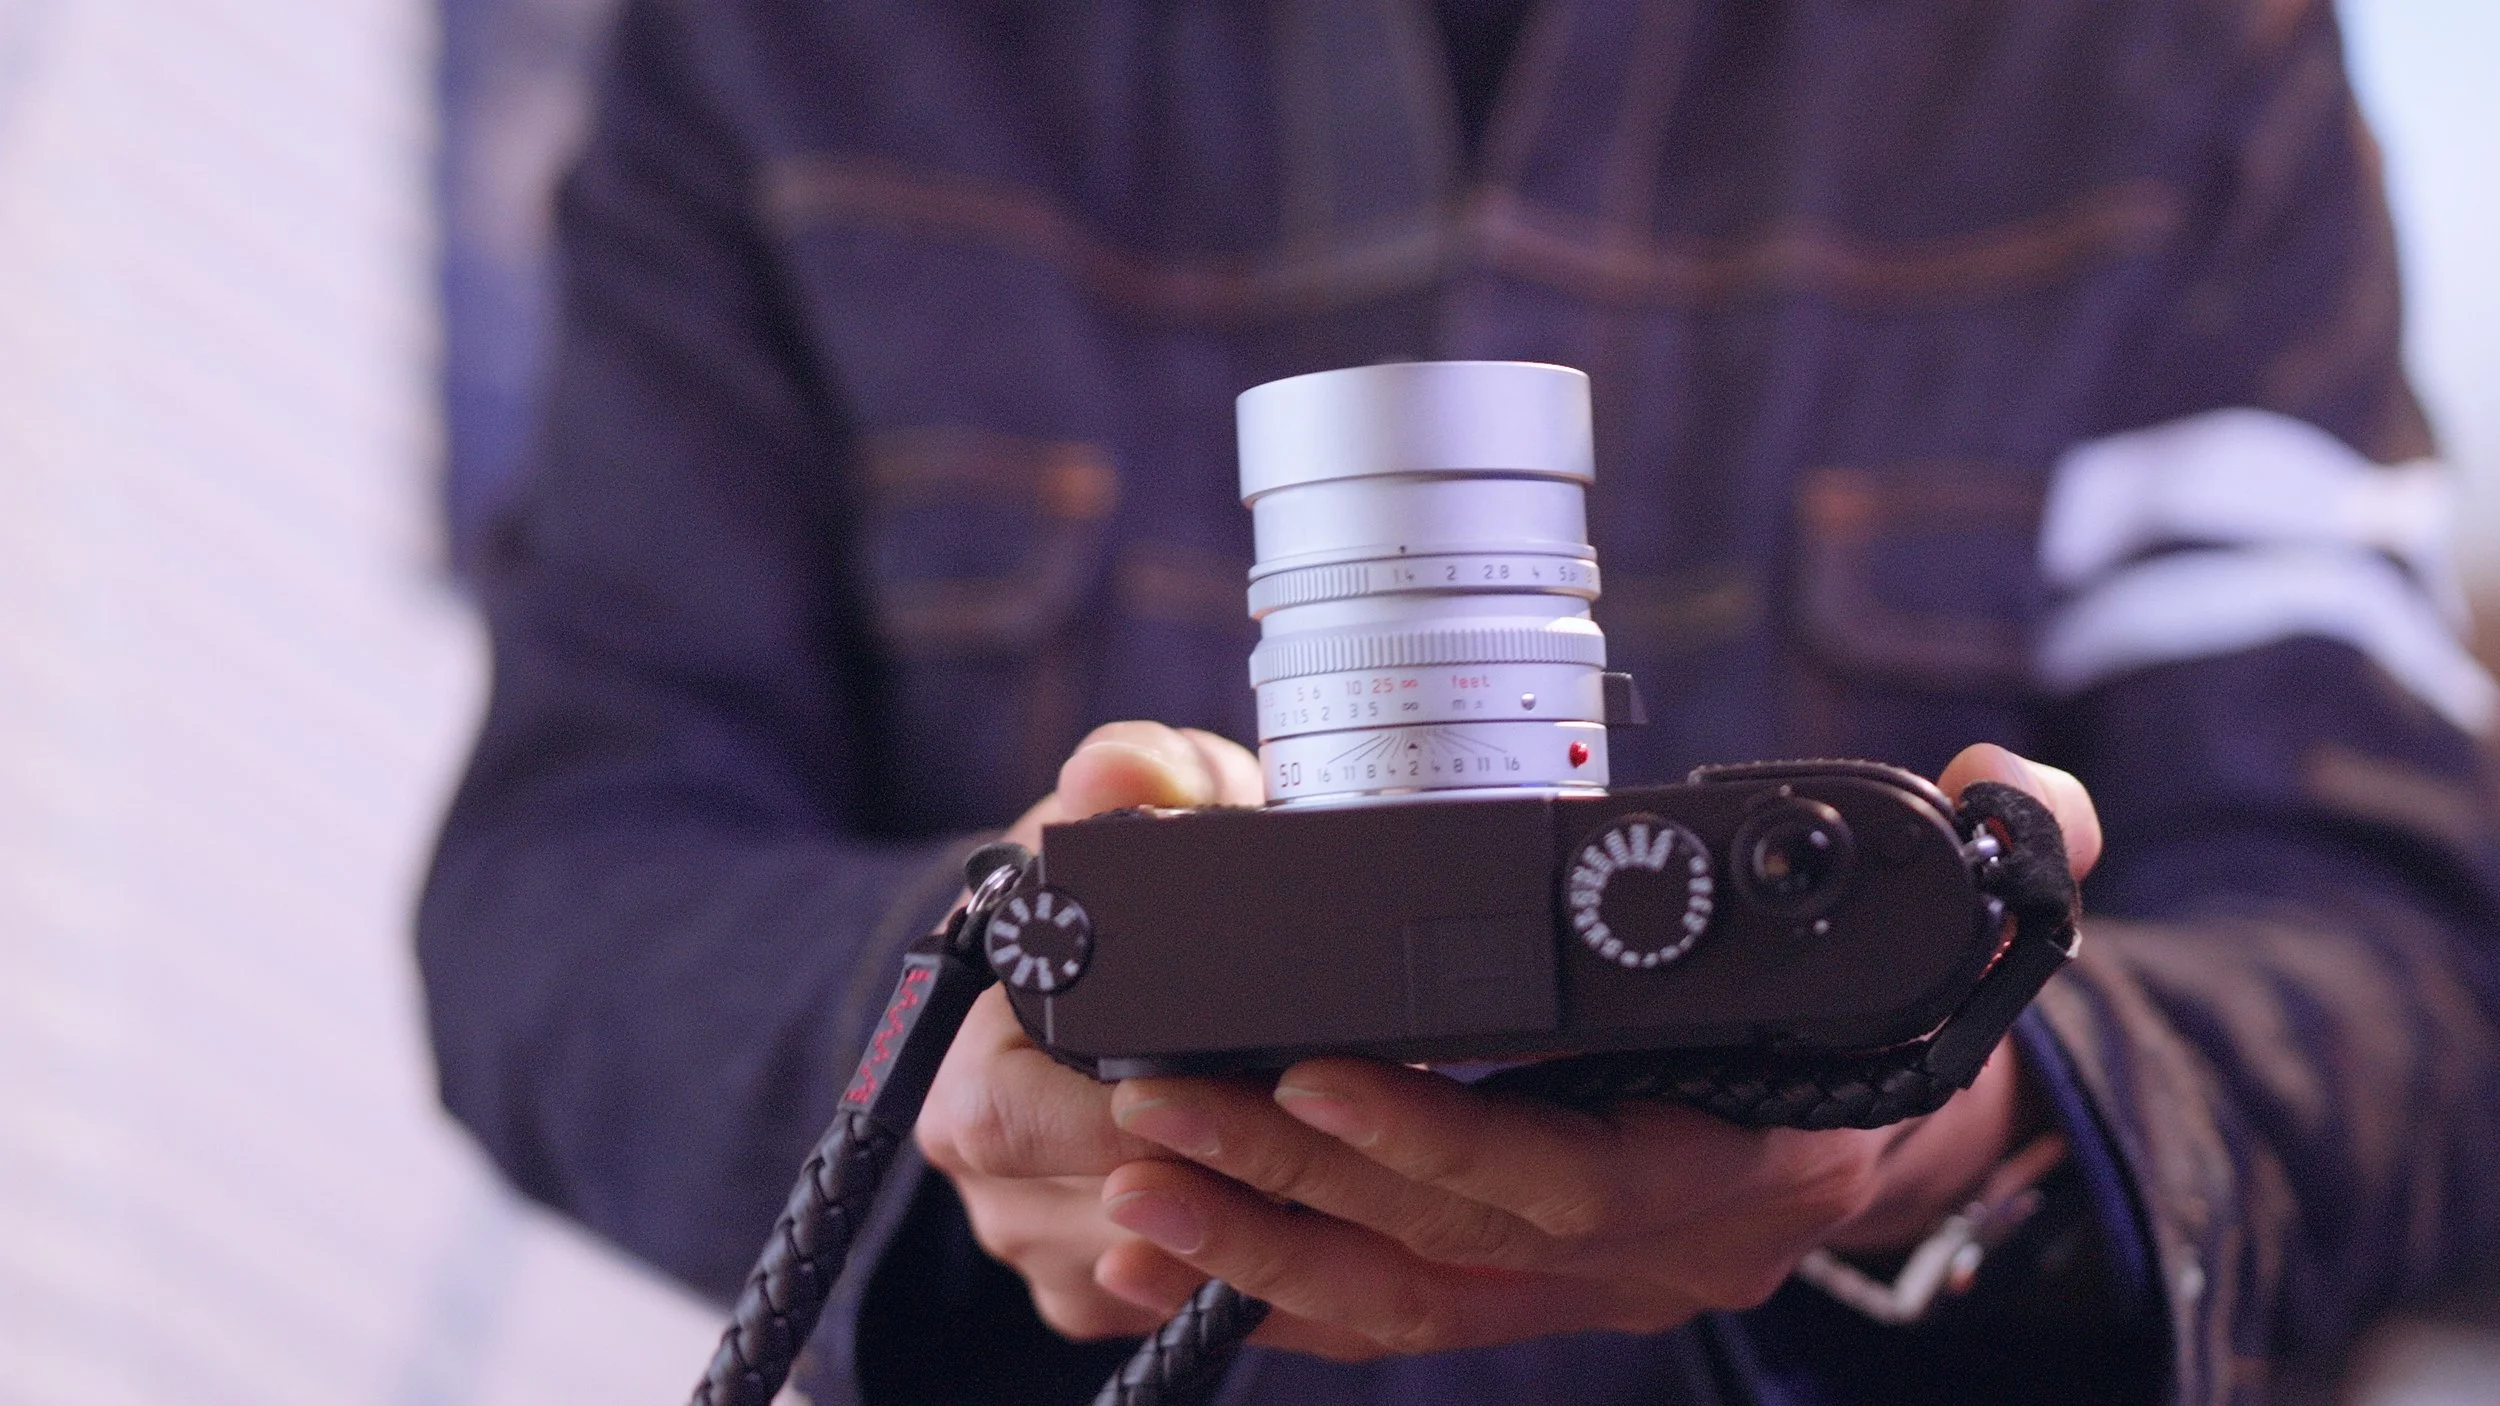
On the Leica? You don’t buy a M11 Monochrome to shoot JPEG - in fact the in-camera JPEG settings on the Leica are a bit of joke - just sharpness and contrast, and what you’re seeing on these Leica images is the first of my two free monochrome Lightroom presets for RAW files. You don’t need a Leica, raw files on either the OM3 or Zf work - as long as you use the Adobe Monochrome camera profile as the base:
Mono-Fade Lightroom preset (free to download)
Go to the presets panel on Lightroom Classic (desktop) - import preset. Works best on “Monochrome” camera profile, tweak exposure slider to taste.


“Mono-Fade”, my first monochrome preset isn’t my go-to look for street work. It’s more flattering for family shots or portraits - the lifted tones, only a touch of grain… but it can work for street if you change:
5: Color Filters.
My favourite’s the red filter during the day - blocks blue and green light, which is the majority of the daytime light - everything looks more dramatic. The OM3 gives you the most flexibility for different strengths of color filters alongside a rotatable color wheel - really neat implementation, the most precise control of color filters in monochrome out of any of the cameras I’ve tested.
The Leica M11 monochrome doesn’t interpret color - it has a monochrome sensor, so the only way to do this is with a physical red filter. Which I wasn’t using on this photowalk, and you can see for yourself the difference in perceived contrast vs the OM3’s red-filter monochrome recipe.

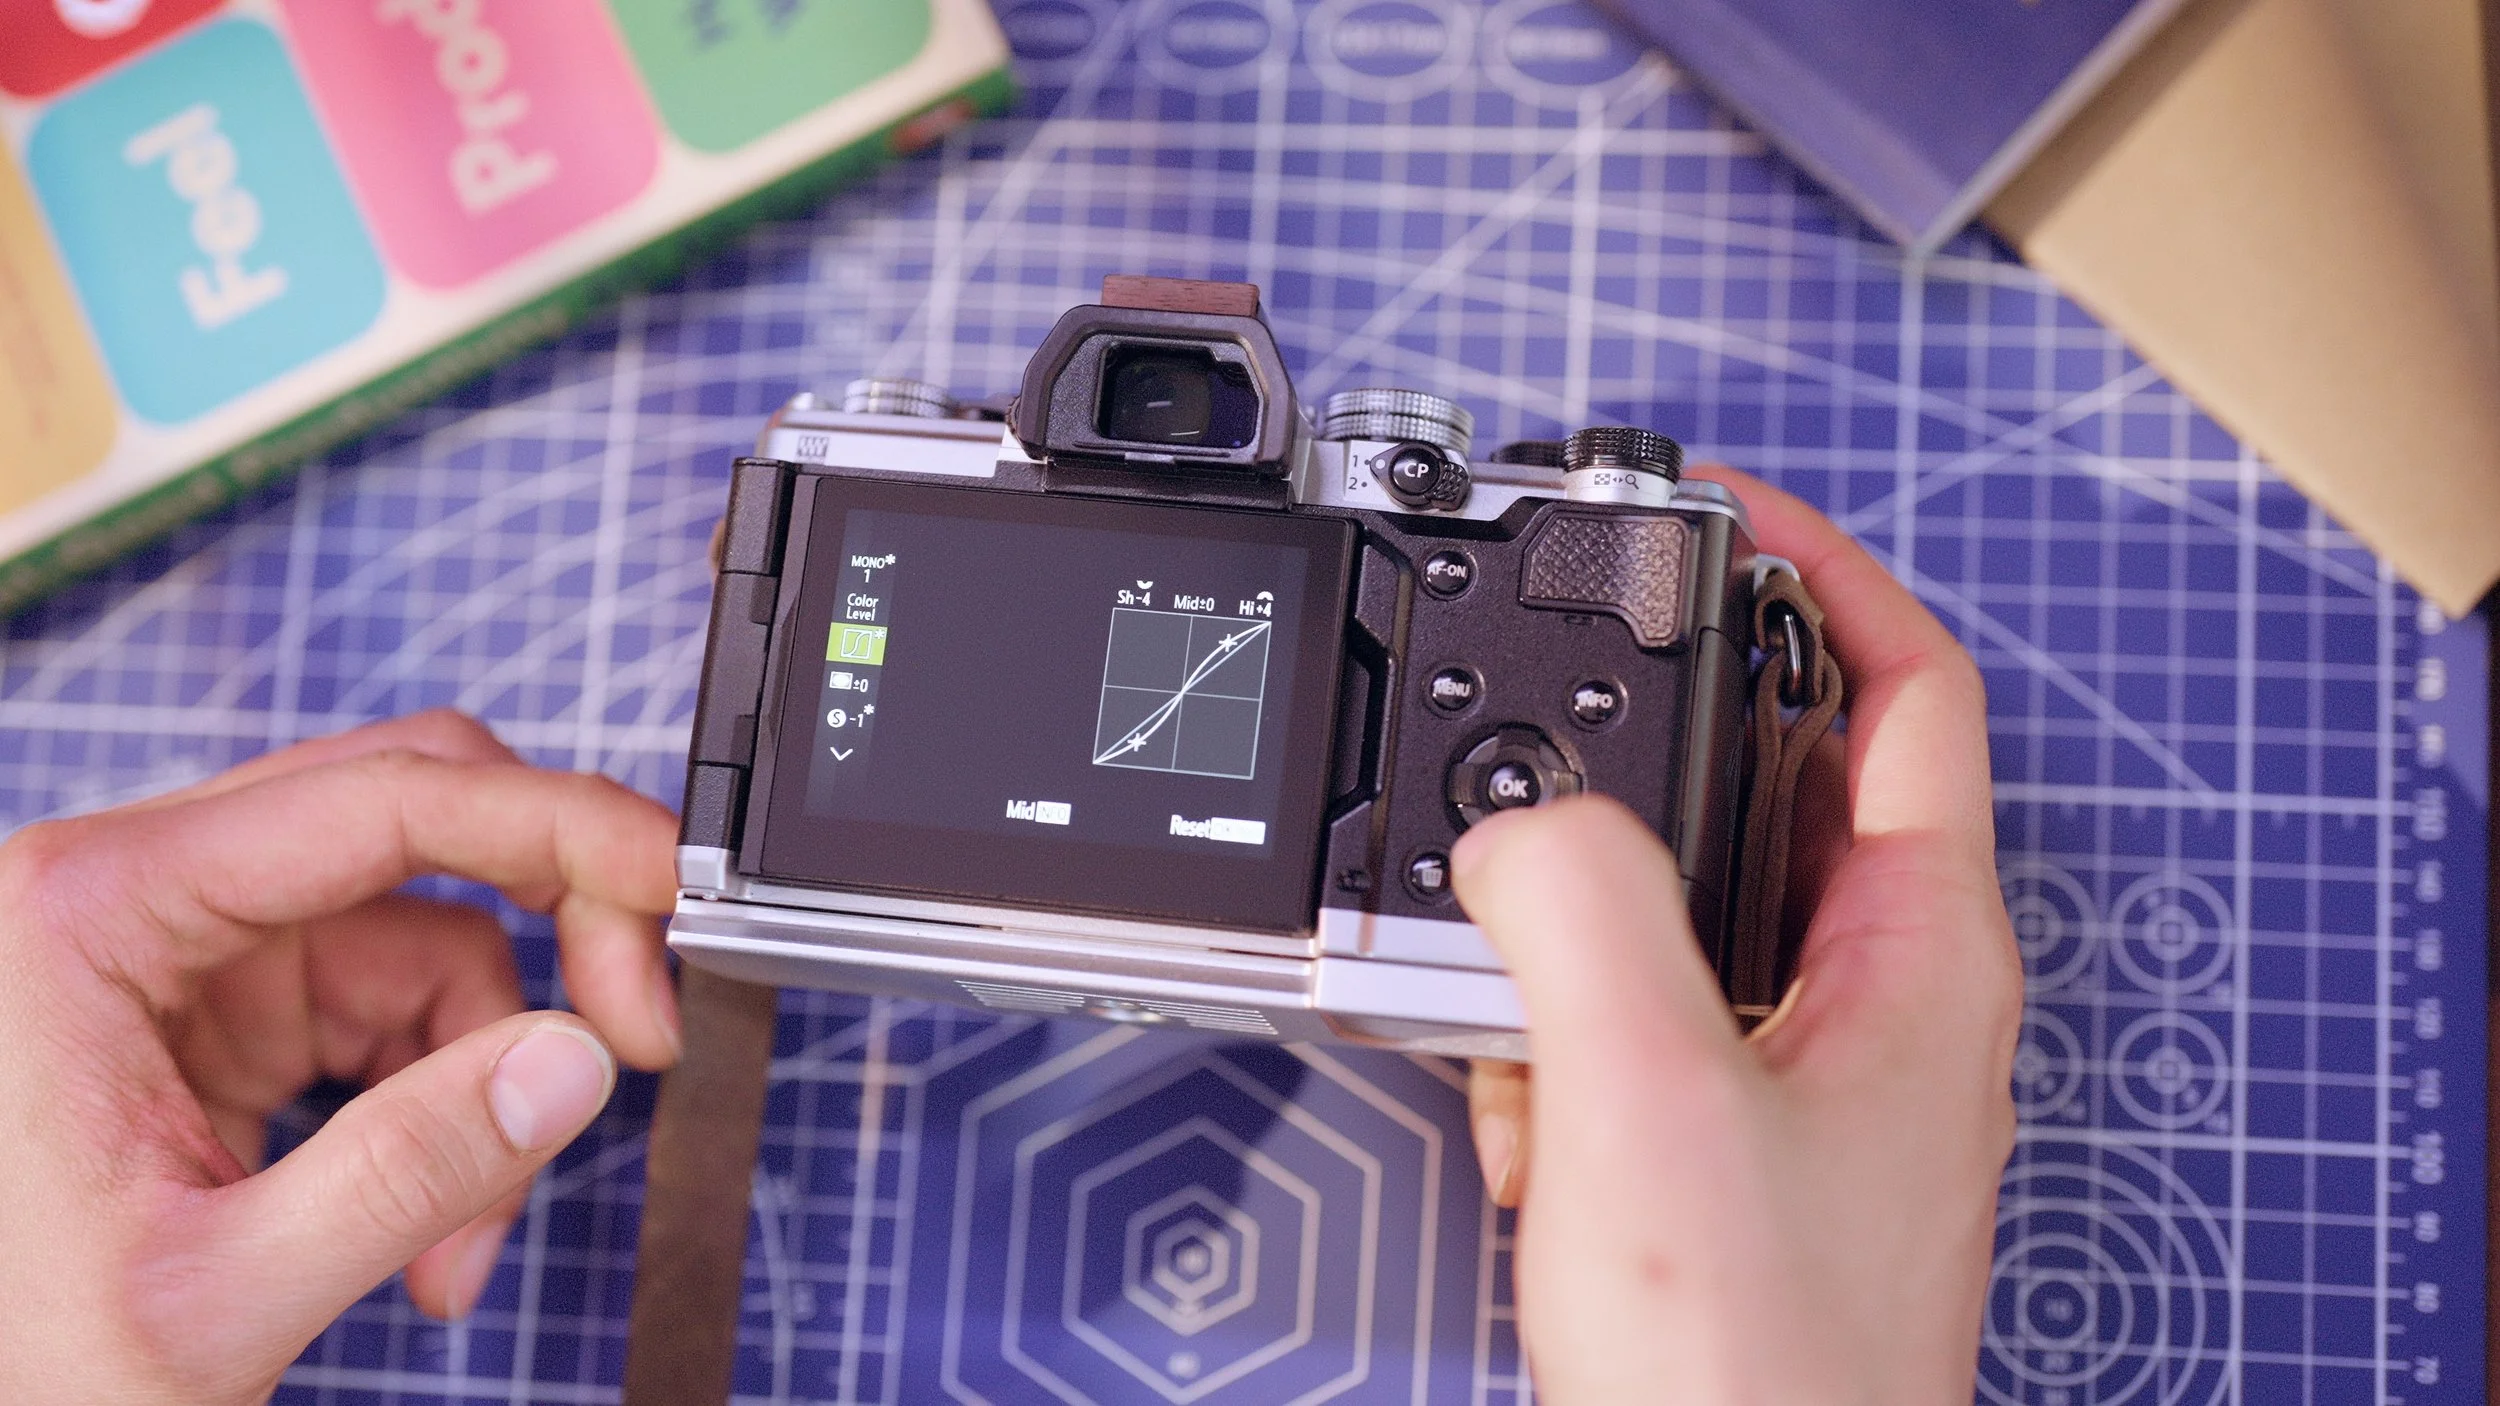
On the Zf you can apply color filters to any of the 3 monochrome settings, but what about curves? You can’t do this in-camera, all you can do is tweak a “brightness” setting, and control exposure more broadly, I hope this is coming in the next Zf firmware update. But on my fourth monochrome photowalk - this time at night - I did apply a curve to these Zf JPEGs.

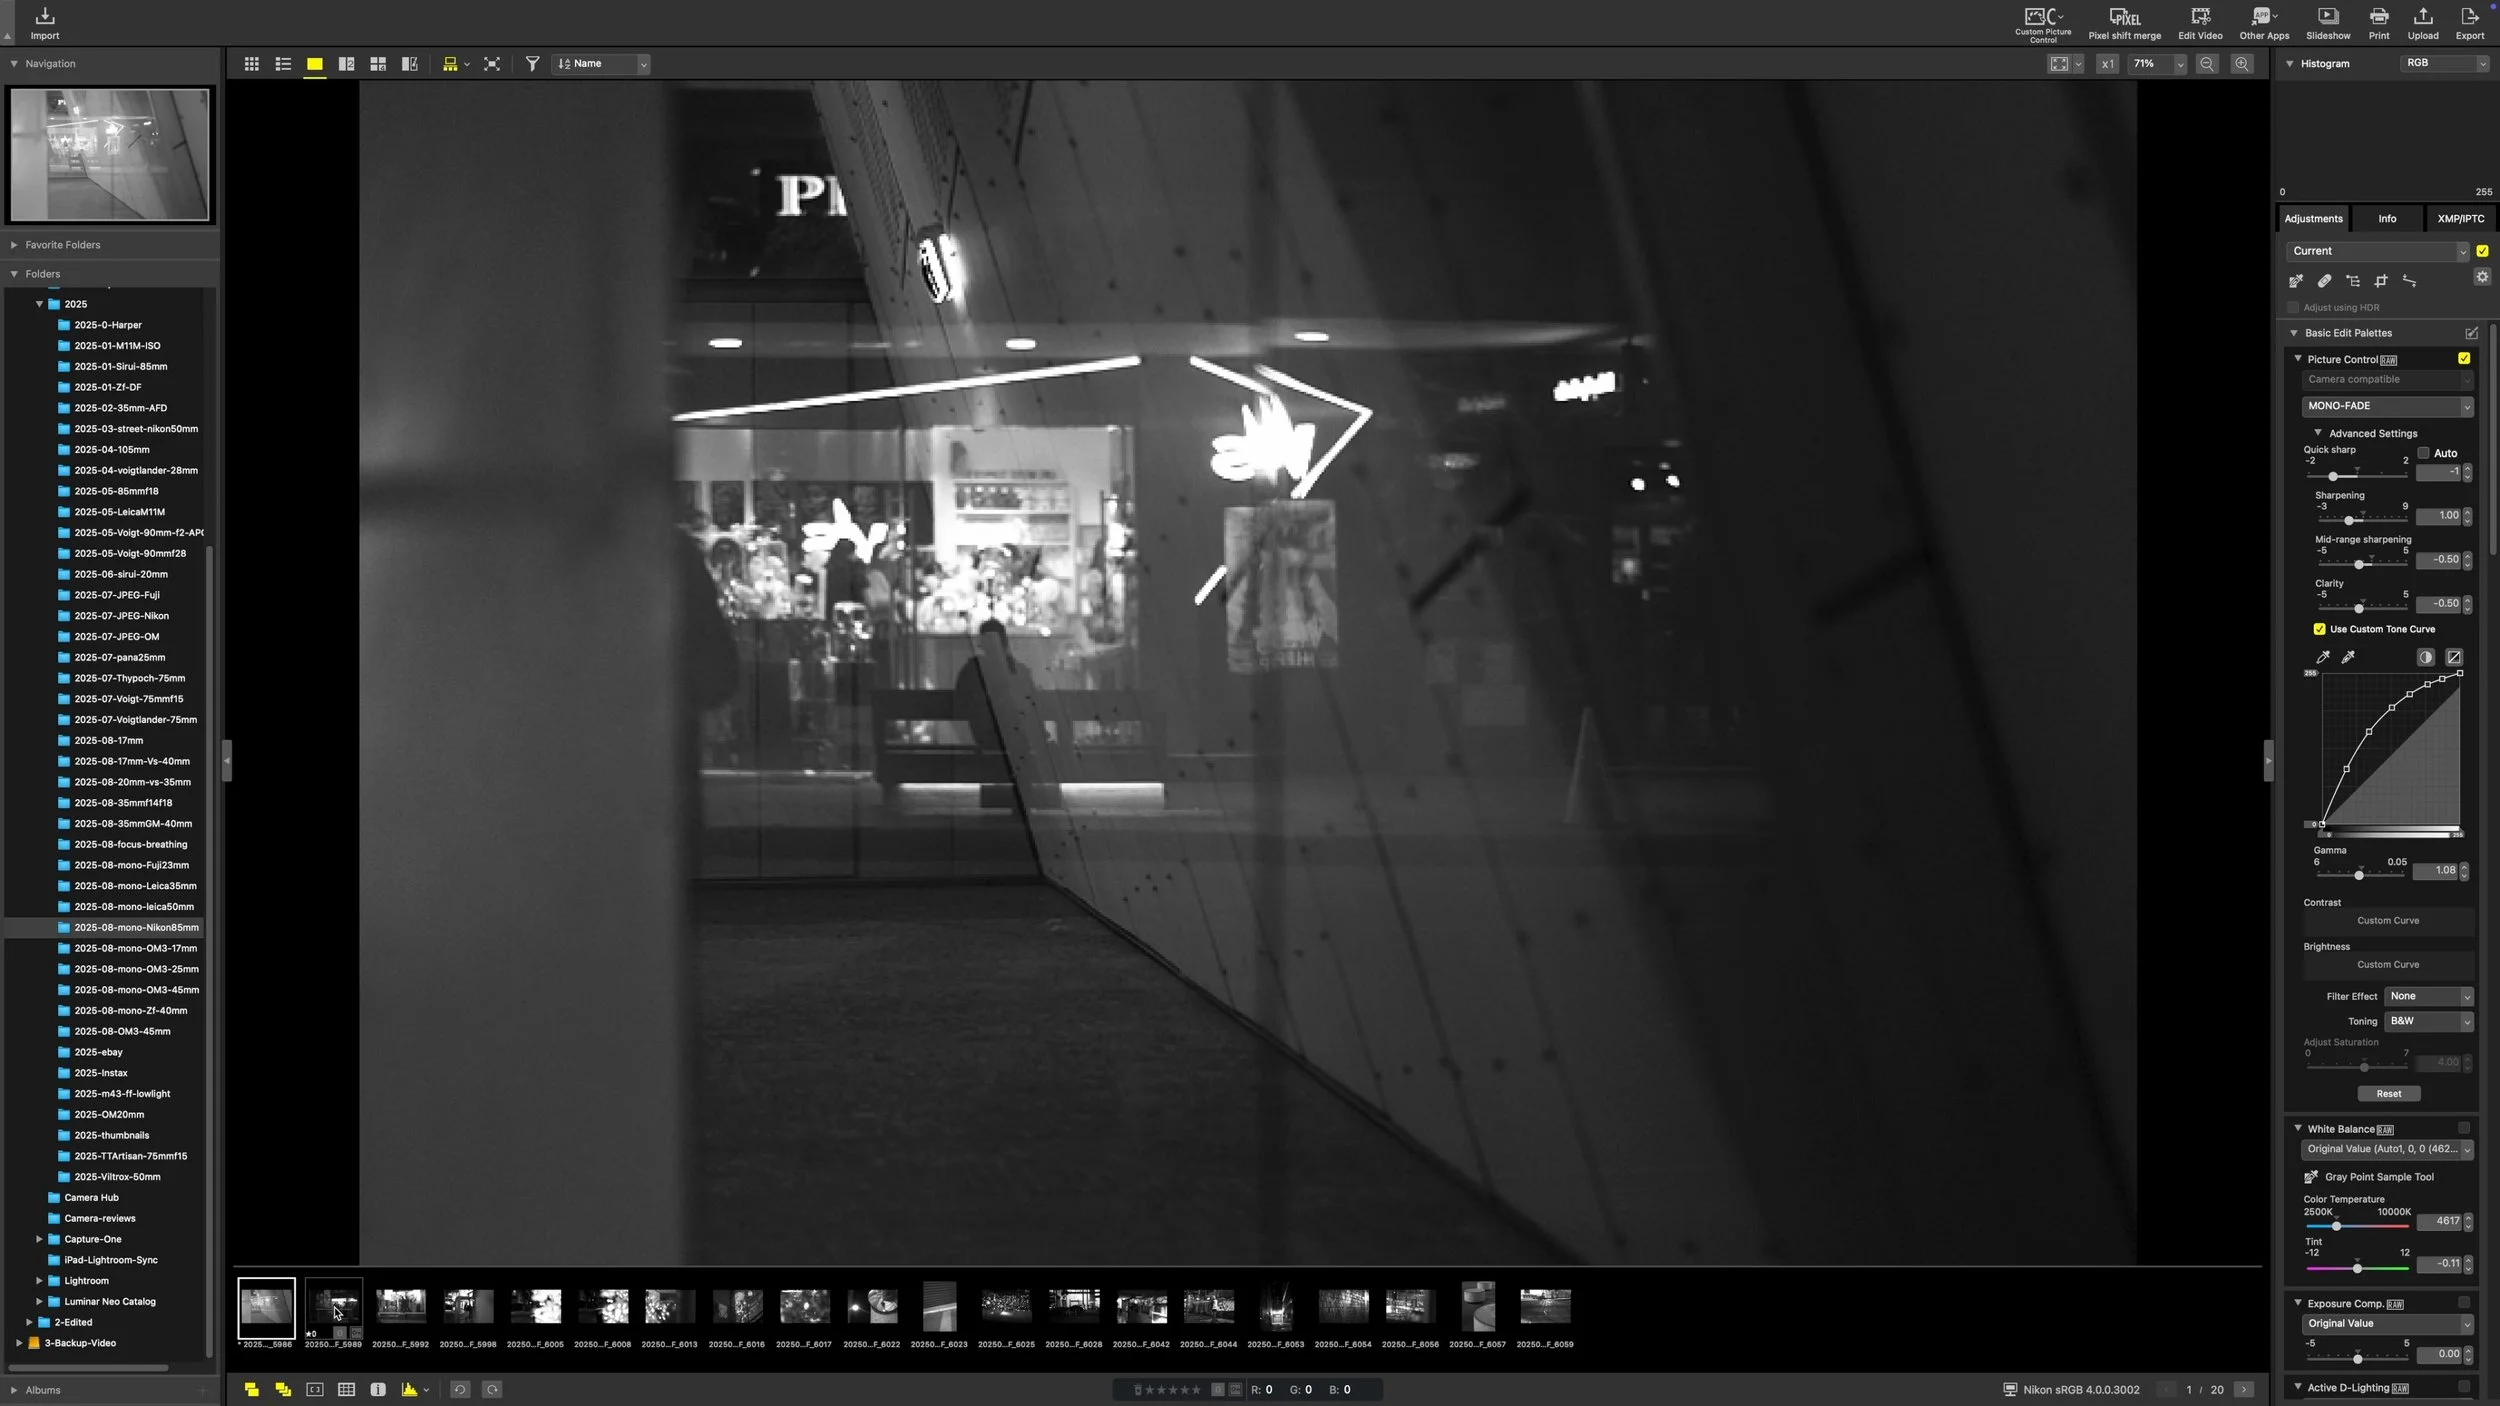
The only way to do this is to go into NX studio, under Picture control, and adjust the custom tone curve there. Being a raw editor NX studio lets you add more points to the curve than the in-camera controls on the OM3, and I like the output of the Zf better. Again this is the gentle fade that lifts tones gradually - this uses flat monochrome rather than deep tone monochrome as the base - I exported it as a recipe file that you can save on an SD card, and load onto your Zf as a JPEG recipe.
For most people this is quicker and easier to do than going via imaging cloud, this recipe is free for you to download like everything else:
ZF JPEG recipe “Mono-Fade”. (Free to Download)
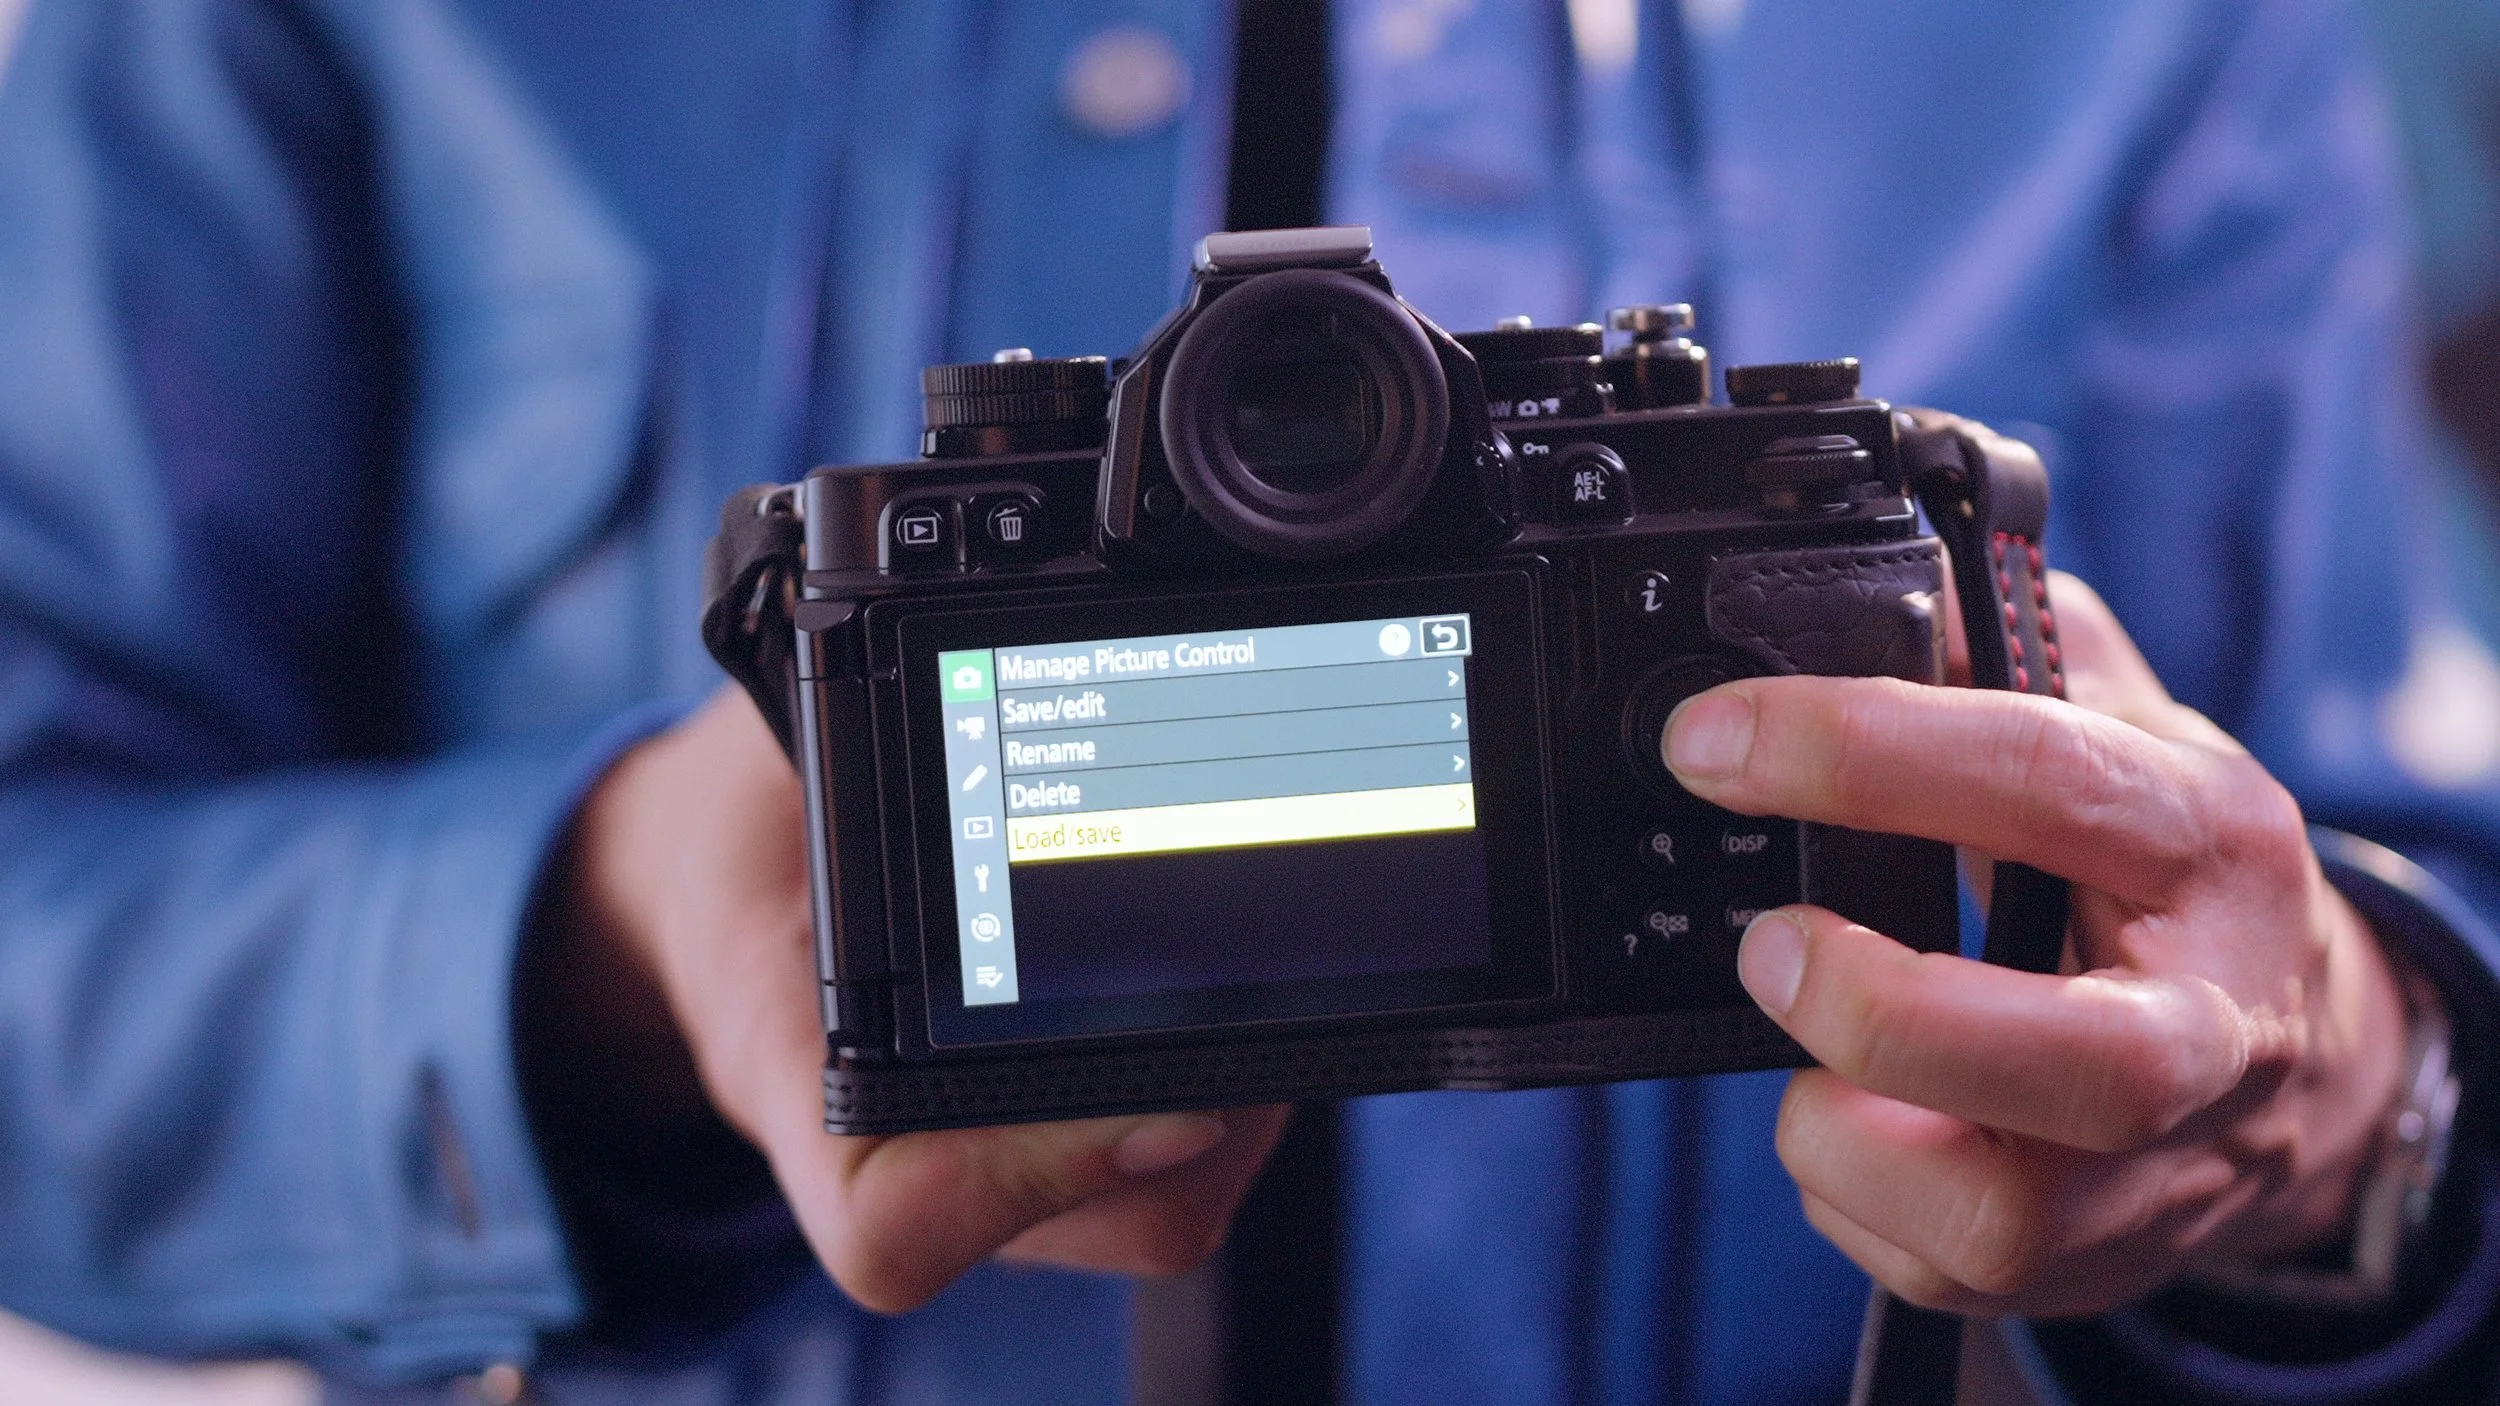
Copy the np3 file to your SD card, then go to “Photo shooting Menu” —> “Manage Picture Control” —> “Load/save” —> “Copy to camera”. It should be selectable as one of your options in “Set Picture Control”.

This recipe works well for night-time photography; it was very dark along the river when I was shooting, and this recipe avoids underexposing, limits the noise hidden in the shadows, as long as you shoot with an exposure compensation of 0 or +0.3. I like this look a lot coming out of the Zf, I was shooting wide open on the Nikon 40mm f2 to get as much light into the sensor in the near pitch-black surroundings. This is where you can’t beat the Leica M11 Monochrome - I was shooting at f5.6, f8, zone-focussing a 35mm lens in the middle of the night.


I didn’t need to use the rangefinder patch to focus, TTArtisan’s new optical viewfinder is bigger and brighter, and its 35mm framelines make composing very easy. It secures onto the hotshoe very tightly - surprisingly so - a great fit for the slew of new cameras that don’t ship with an EVF - perhaps a Nikon ZR? Or a Panasonic S9, Fuji XM5 - anything you can pair a 35mm lens with.

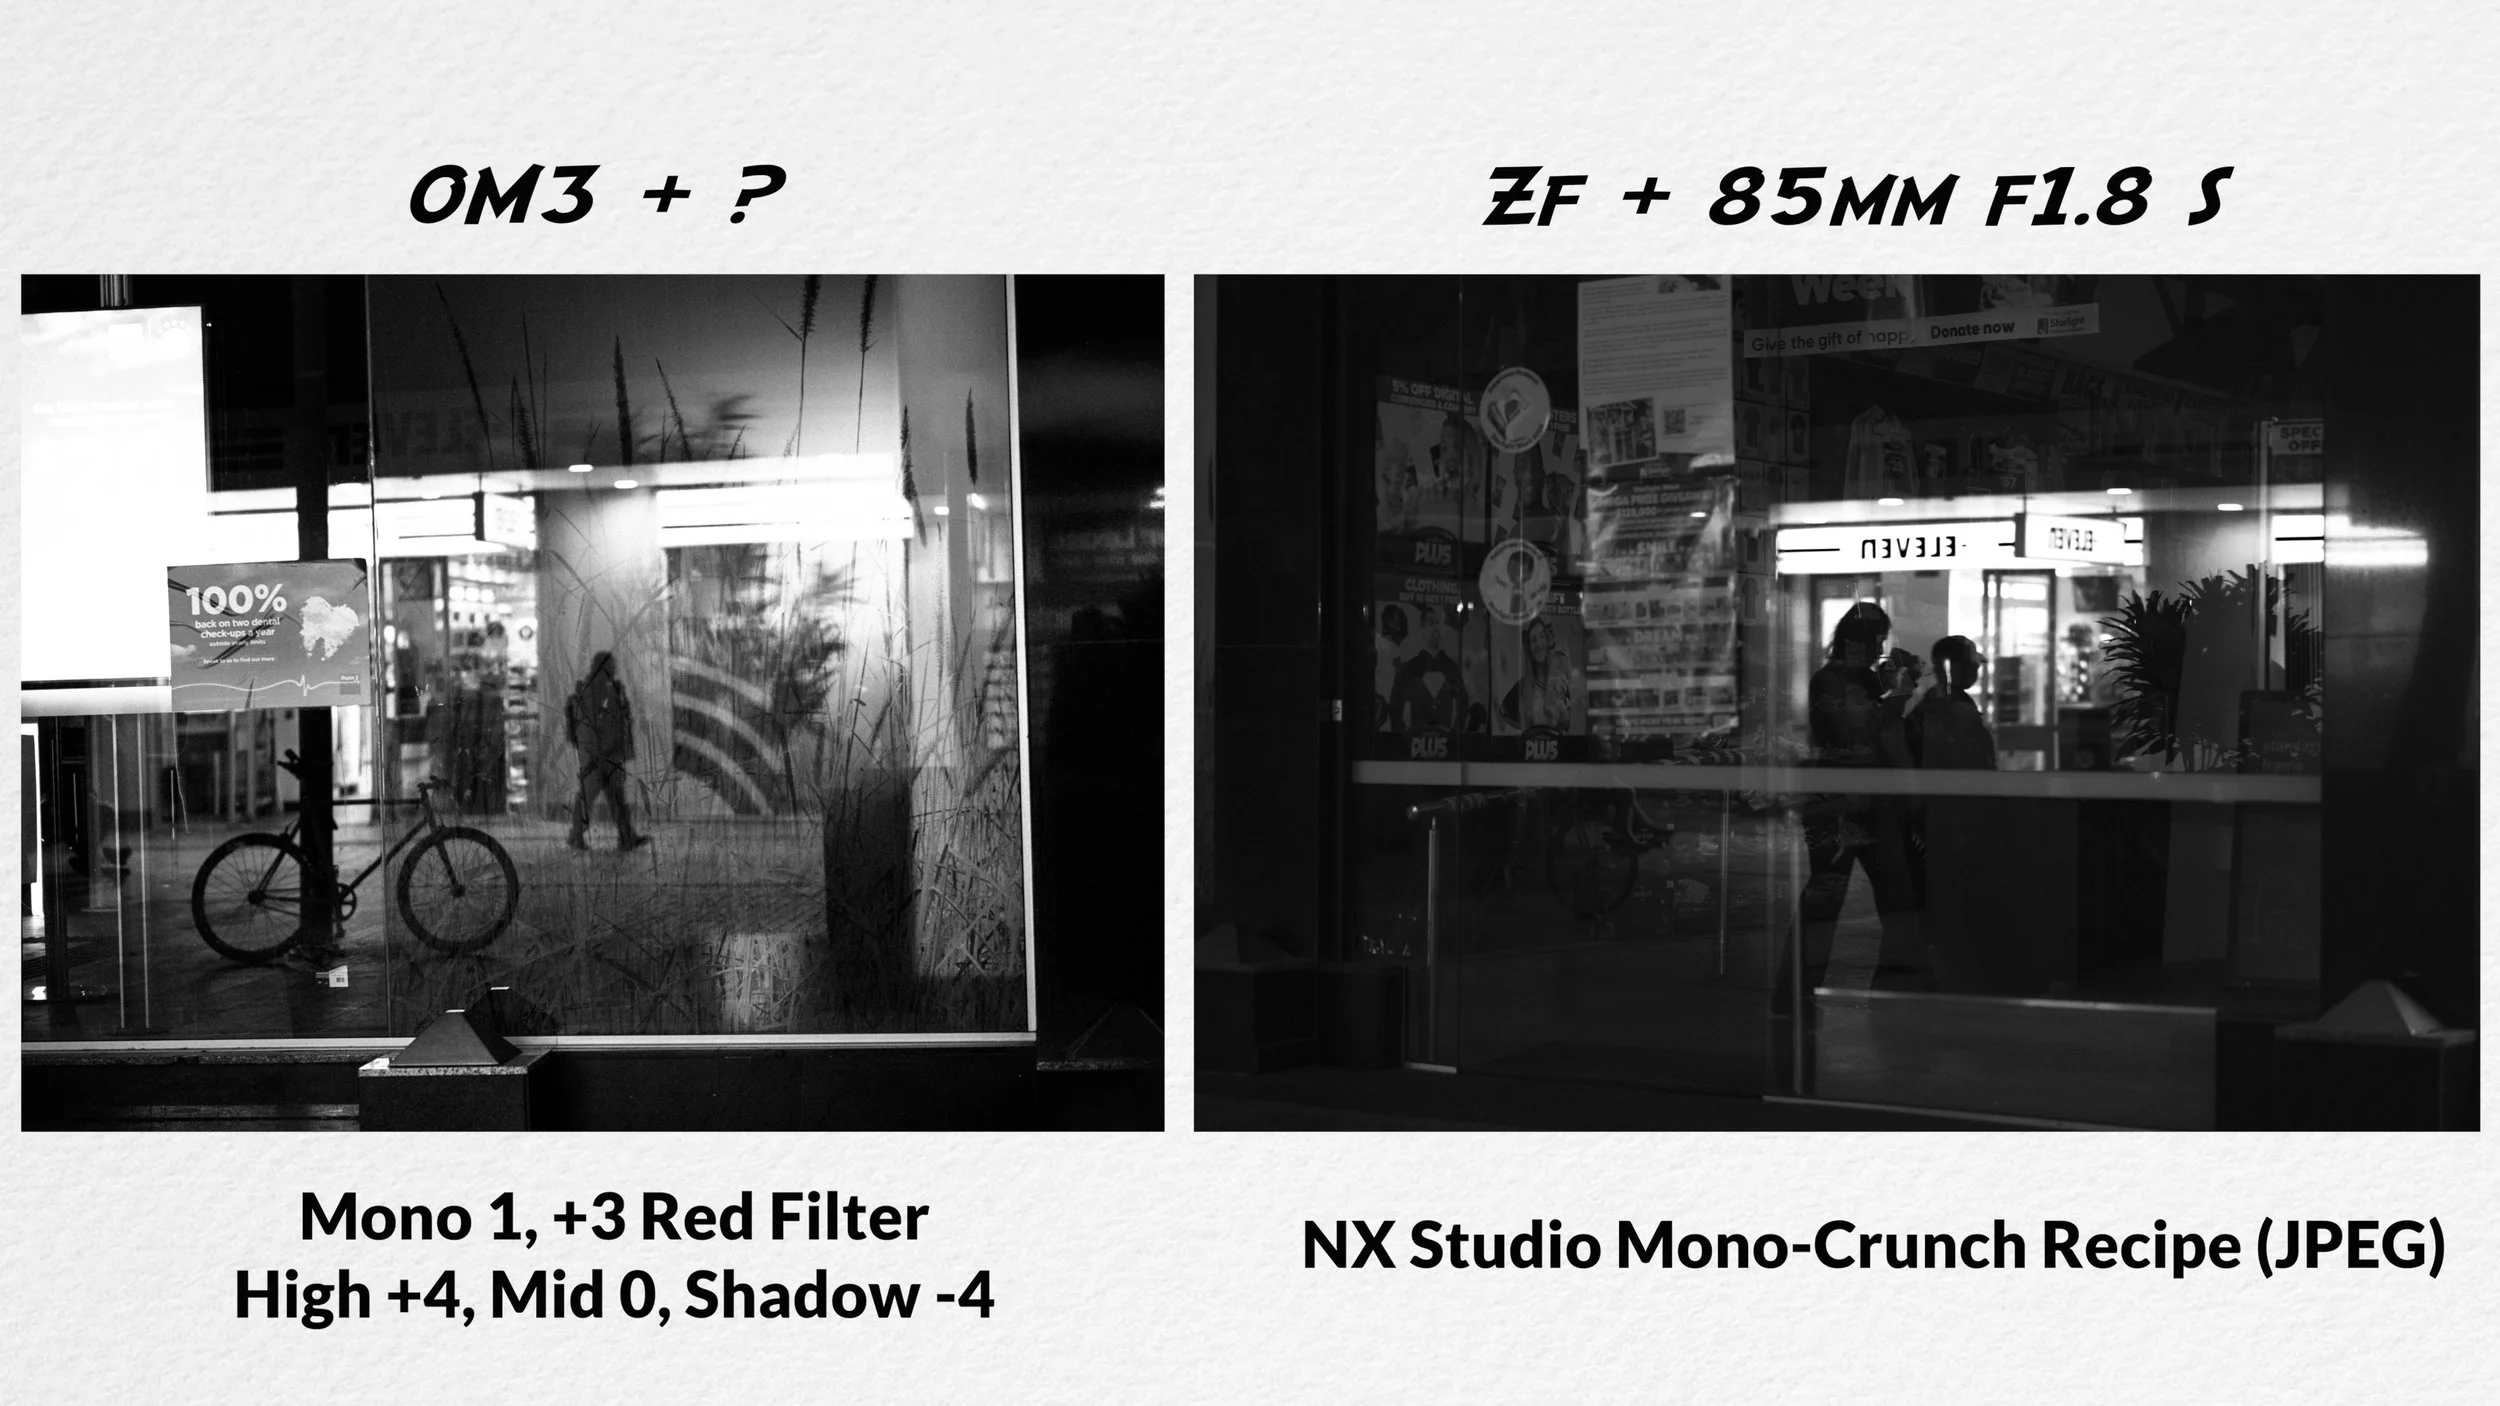
But the gentle fade recipe didn’t work as well on my fifth and last monochrome photowalk - near the city centre at night. This curve would overexpose the bright neon lights, and make the whole scene a little too flat, so my second black and white recipe uses a S curve: “Mono-Crunch”.
ZF JPEG recipe “Mono-Crunch” (free to download)
Copy the np3 file to your SD card, then go to “Photo shooting Menu” —> “Manage Picture Control” —> “Load/save” —> “Copy to camera”. It should be selectable as one of your options in “Set Picture Control”.
On the OM3:
Mono 1 Profile,
Film Grain: low
Color Filter: Red + 3
Highlights: + 4, Midtones 0, Shadows -4,
Sharpness -1, contrast -1.
On the Zf (you can download the np3 file above if you like):
Deep Tone Monochrome profile
Quick Sharp: -1
Sharpness: -1
Contrast: -1
Filter: Red
Curve - NX studio custom tone curve (S curve)
But the biggest factor for this look comes down to:
6. Lens Choice

While monochrome shooting hides a lense’s purple fringing, its sharpness and microcontrast are on full display. The Zf with the 85mm f1.8 S is a super sharp combination - the image is contrasty and crisp already before any recipe’s applied. I’m shooting with a mystery lens on the OM3 - and it could be the deeper depth of field on the smaller micro four thirds sensor, playing tricks on me, but it looks sharper?


It could be the curve on the OM3 is applied more aggressively than the Zf’s custom tone curve from NX studio, but the same scene gives off a different look.
I couldn’t quite match the look of the monochrome output even with all the controls raw editing affords you. Choosing the right lens, to get the look in camera, does more than half the work for you in black and white.
I’ll do whatever it takes to keep things fun.
The OM3 recipes listed above, 2 downloadable Zf recipes to load on your SD card, and two monochrome lightroom raw file presets: Mono-Fade and Mono-Crunch are all designed to save me time.
Everything’s free to download - let me know if you find it useful, or how you’ve tweaked it to make it better for your workflow!
For the ZF JPEG recipes: Copy the np3 file to your SD card, then go to “Photo shooting Menu” —> “Manage Picture Control” —> “Load/save” —> “Copy to camera”. It should be selectable as one of your options in “Set Picture Control”.
For the Lightroom Presets: Go to the presets panel on Lightroom Classic (desktop) - import preset. Works best on “Monochrome” camera profile, tweak exposure slider to taste.
I want a camera always beside me, and if any of my presets make things easier for you too that’s a win-win.
I have to go on a last minute trip next week - and the mystery lens and the OM3 this time will be the centre piece of my travel kit. You’ll the next post ready to go when I get back from my trip.
Happy shooting everyone, talk soon.
Jack.

This blog and post is sponsor-free. If you’d like to support my work please consider purchasing gear through my affiliate links. To make this post and the associated video this is the gear I used:
TTArtisan 35mm External Optical viewfinder: https://geni.us/EMETPg
OM 17mm 1.8 ii: https://geni.us/dKGUpZ
Panasonic Leica 25mm f1.4 ii: https://geni.us/jtVR
OM 45mm f1.2 Pro: https://geni.us/g7sDe
Nikon Zf: https://geni.us/YOH8bh7
TTArtisan 40mm f2 (E/Z mount): https://geni.us/5WWDz
Nikon 40mm f2 Z: https://geni.us/0AAhXJ
Fujifilm 23mm f1.4: https://geni.us/onaO7